Results 1 to 22 of 22

Thread: My Uber Skimmer: an ASM G-3 Modification

  1. #1
    Apprentice
    Join Date
    Jun 2006
    Location
    Nova Scotia Canada
    Posts
    101
    Thanks
    0
    Thanked 0 Times in 0 Posts

    My Uber Skimmer: an ASM G-3 Modification

    Hi All
    I’ve Had this thread going on Reef Central for a few weeks now, and I though I would being it over to Talking Reef to see what you folks though.
    I have a 90 gallon reef, pretty much just FOWLR for now, with a couple softies, but my goal is to make it an awesome SPS tank. Here’s a link to the tank log
    http://www.reefcentral.com/forums/sh...hreadid=847805
    As everyone knows, a healthy SPS tank needs powerful efficient protein skimming. I of course knew I was going to have to throw down the big bucks for a real skimmer sooner or later. I’ve also toyed with the idea of making a skimmer myself, but I really didn’t know enough about them as far as which design was best, and working with acrylic or PVC, so I chickened out. Instead I opted to go somewhere in between making my own uber skimmer, and buying one. I had read allot about the ASM skimmers, and some of the modifications that people have been doing on them, and I decided this was the approach I was going to take. ASM’s are needle wheel skimmers that are pretty low cost for the performance they offer. They are basically Euro reef clones, but use PVC bodies and Sedra pumps that help keep costs down, as opposed to cast acrylic bodies and Eheim pumps of the Euro reefs. I love euro reef skimmers, and by no means am I bashing them, but your skimmer doesn’t need to be pretty, it just needs to work.
    Anyhoo, so after a little research I decided on the ASM G-3 skimmer to start off with. For the longest time I was going to go with the G-4X model, which was much bigger and much more expensive, but the G-3 eventually won me over because it seemed like the most bang for my buck, and I wouldn’t have to do any major sump modifications to be able to fit it in (12”x8” is the approximate footprint. The G-4X has a footprint of 14”x16”).
    So anyway, here it is, the ASM G-3 right out of the box. The body is 6.5” in diameter, it stands 14” high (including the collection cup), and it comes with the Sedra 5000 needle wheel pump.

    and the needle wheel

    I tried the skimmer out over night as it was. I did this A: because I wanted to see what the stock skimmer could do before modifications, and B: because I am hopelessly impatient by nature and I really wanted to see this baby running.

    I was happy with the performance, but I defiantly saw area for improvement.
    First, the bubbles in the skimmer body were pretty big. Ideally they should be about as big as the tip of a bald point pen, and these bubbles were about the size of rice grains (if rice grains were round…). I had several ideas on how to improve this. Second. The adjustable arm was pretty hard to move up and down to adjust the water level in the skimmer. I thought a gate valve would help with this. And third, I notices allot of micro bubbles coming out of the skimmer exhaust. The gate valve would also help with this.
    I'm not as think as you stupid I am

  2. #2
    Apprentice
    Join Date
    Jun 2006
    Location
    Nova Scotia Canada
    Posts
    101
    Thanks
    0
    Thanked 0 Times in 0 Posts
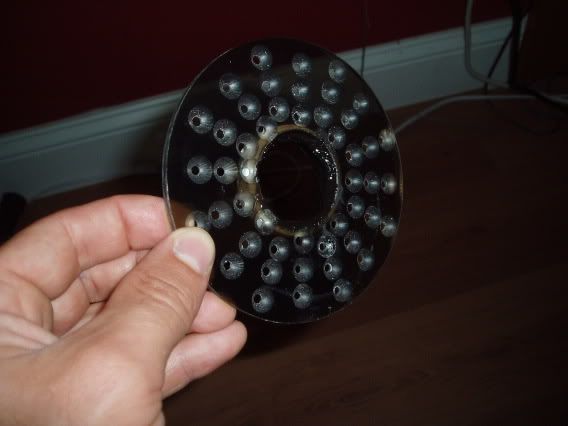
    Fist things first. After I pulled the skimmer back out of the sump, I decided to bore out the venturi so more air could be sucked into the skimmer. Pretty easy to do as seen here:

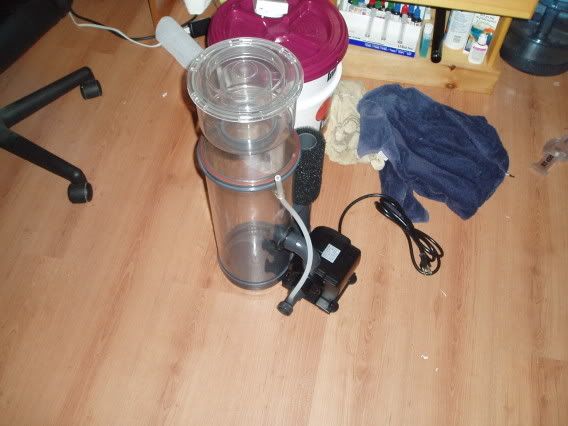
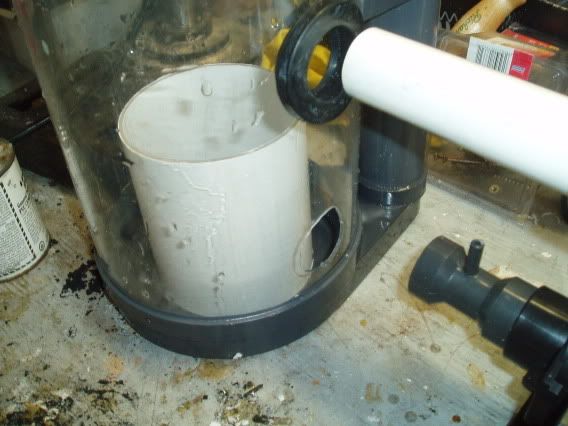
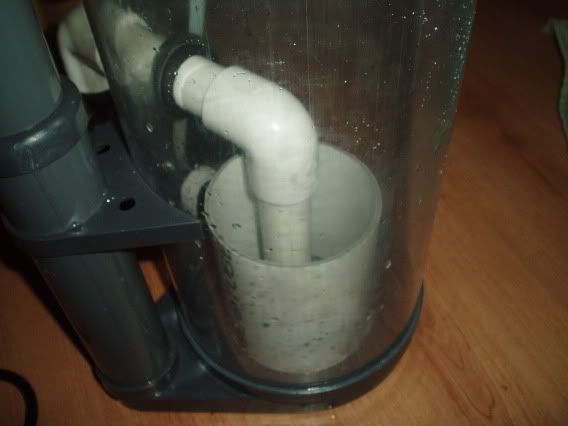
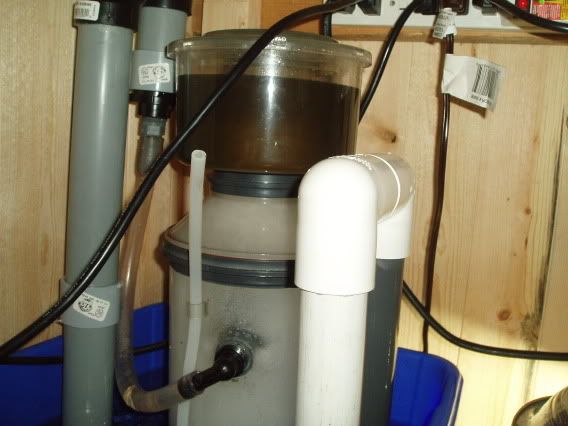
    Now, this is probably the most popular modification people do to their ASM skimmers. It is called the recirculation mod. I fist read about it at www.asmskimmer.com . It is an incredibly simple way to juristically increase the performance of the skimmer. A stock needle wheel skimmer sucks water in from the sump with the main skimmer pump (the needle wheel) and the water gets processed once before it gets blown out of the exhaust tube. A recirculating needle wheel skimmer sucks water in from the bottom of the skimmer and shoots it right back in so the same water gets processed over and over which increases the dwell time (time the water stays mixed with the air) and thus the amount of sludge the skimmer can take our of the water.
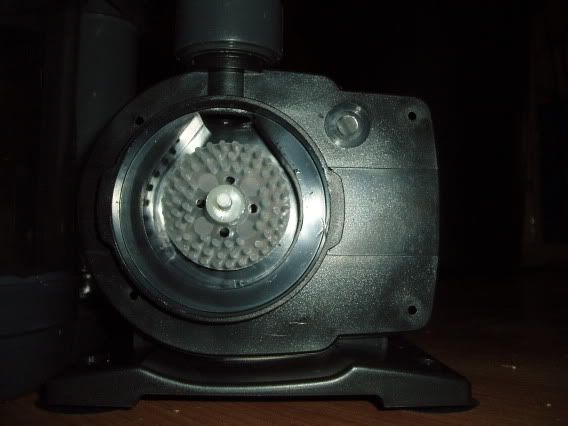
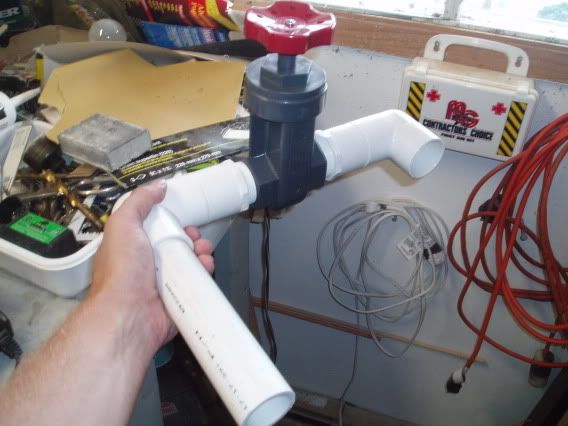
    The modification itself is fairly simple, but you’ve only got one shot at it or you ruin your skimmer. I simply turned the pump so the venturi was positioned up against the skimmer body, then I used a dermal to cut a hole in the skimmer body so the venturi could stick in. I also replaced the elbow that came with the pump and fed the skimmer with 1” PVC because the stock elbow was not long enough.

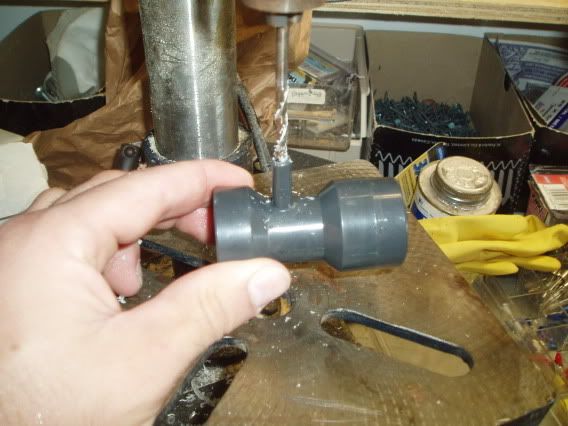
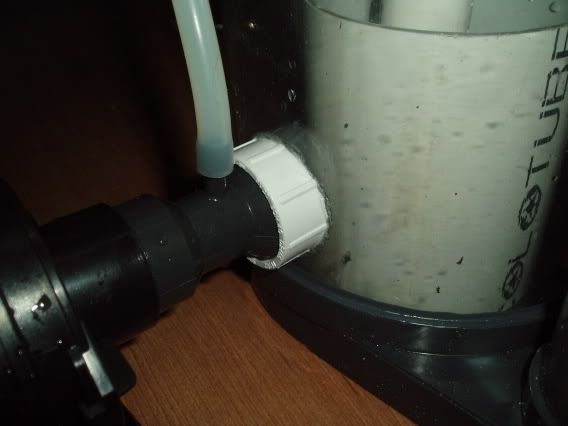
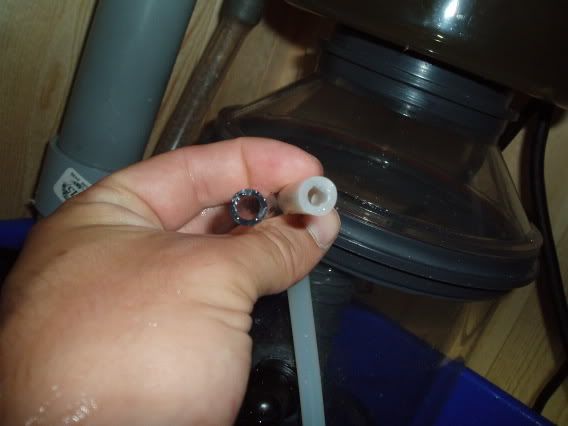
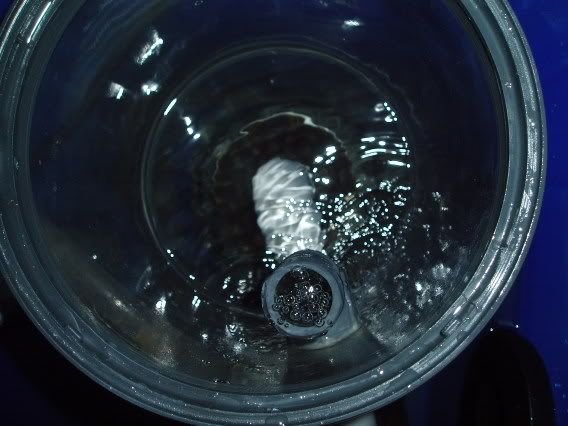
    Next, I had to make the new hole for the venturi water tight (or as close to it as I could. Its an in sump skimmer thank goodness, so its not all that important). At asmskimmer.com they use rubber seals called uniseals, which are basically flexible rubber bulkheads. If you can get your hands on one of them, it would be best, but I couldn’t fine them around here for the life of me, so I improvised. I took a 1” PVC coupling, and cut it in half. I then worked it on the belt sander to fit the outside of the skimmer body exactly. I used regular PVC glue to stick it to the skimmer body accept the venturi, and it worked perfectly.

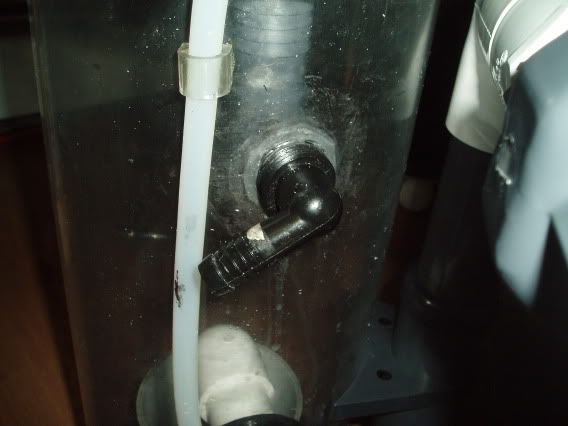
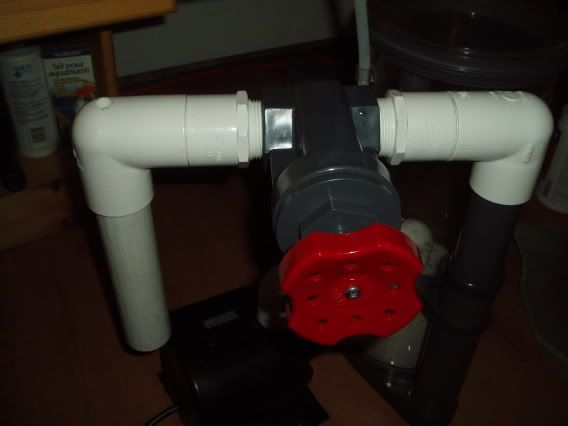
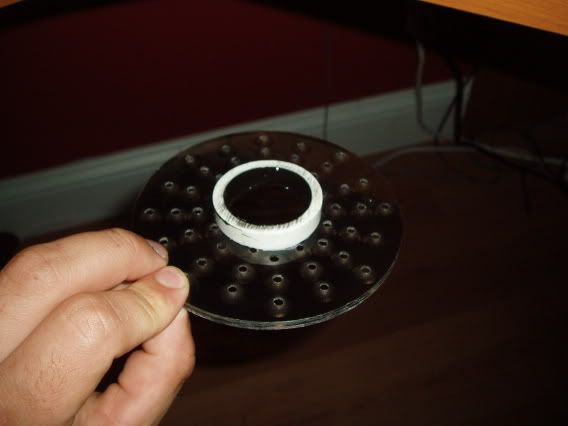
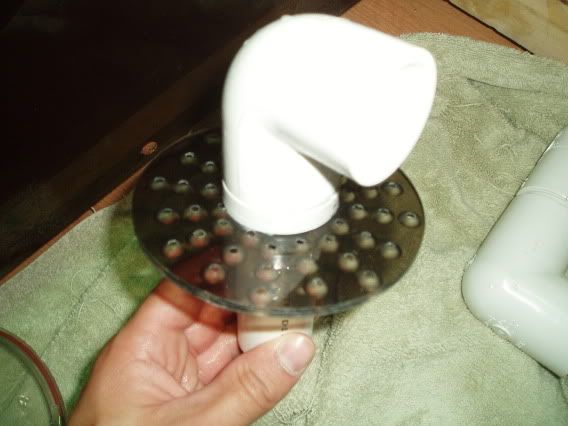
    Of course, on a recirculating skimmer, the needle wheel pump re-circulates the water, not feeds the skimmer, so another method has to be used to get the water from the sump into the skimmer to be processed. For this I took a ¾” male thread by ½” barb elbow fitting and cut a hole for it in the skimmer body. On the inside of the skimmer I glued (again after working it on the belt sander to match the contours of the inside of the skimmer) a ¾” female thread by ¾” barb elbow to accept the outside elbow fitting. I could now attach this fitting to ½” vinyl tube to feed the skimmer.

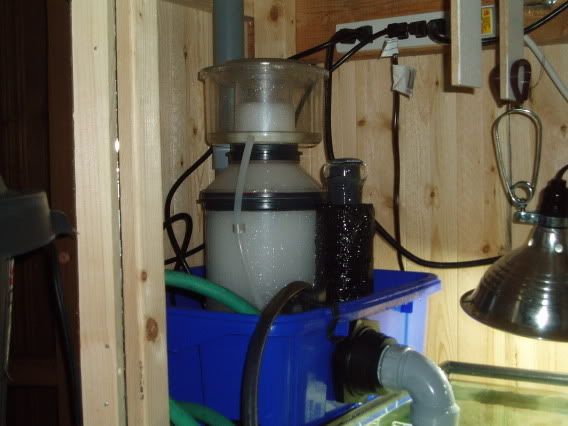
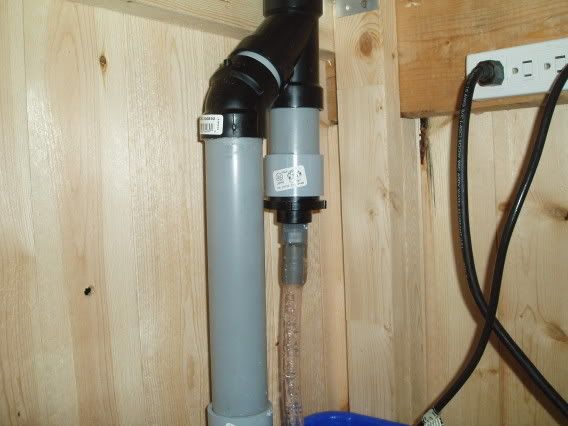
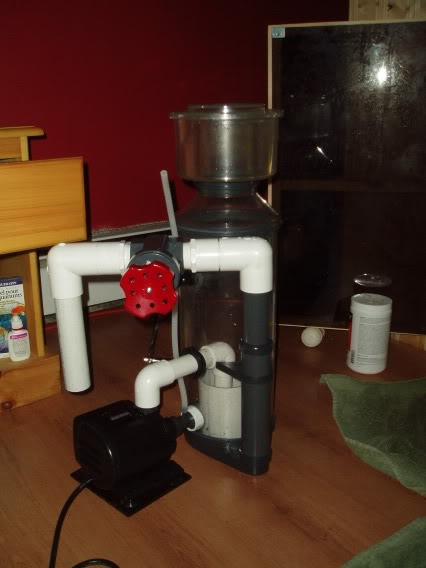
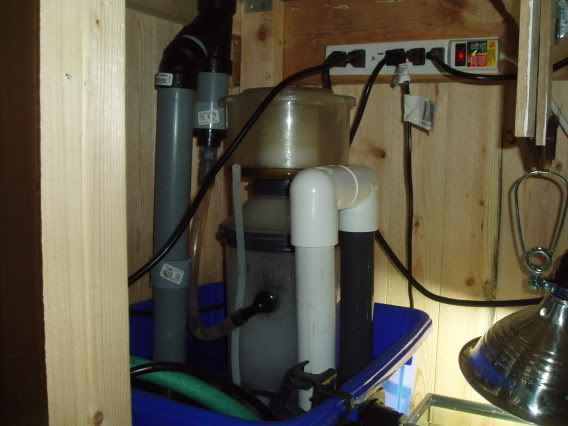
    Some people use small submersible pumps or a power head to feed the skimmer, but I wanted to feed it directly off the drain line from the main display tank. This is a great way of doing it because it doesn’t require another pump (which cost money and use energy) and it allows the nutrient rich water off of the surface of the display to be directly processed by the skimmer. Here’s a pic of the set up I used to run a tube of the drain line.

    the vinyl tube runs to the skimmer while the 1 ½” PVC takes care of whatever water is left.
    I'm not as think as you stupid I am

  3. #3
    Apprentice
    Join Date
    Jun 2006
    Location
    Nova Scotia Canada
    Posts
    101
    Thanks
    0
    Thanked 0 Times in 0 Posts
    Finally there’s the gate valve, which was also incredibly easy to install. The G-3 uses 1 1/4” pipe for the exhaust, and I happened to have a 1 ¼” gate valve left over from an failed skimmer project so the decision was simple. Everything you see is dry fitted, no glue used.

    and fits on like so

    notice the small hole on the elbow fitting to the right. Ideally this should be a T fitting which will help eliminate micro bubbles from flowing out of the exhaust (bubbles float up while water goes down), but the plumbing store was all out of 1 ¼” T fittings, so again, I improvised.

    The last thing I did was install a bubble cup (that’s what I’m calling it anyway). The bubbly water will be fired into this cup directly from the pump, where it will mix around before flowing upwards to make foam. This will help reduce turbulence in the skimmer body (above the cup) which will keep the bubble sizes down. H and S and bubble king skimmers use a similar design. I am toying with the idea of putting a bubble diffuser plate, like on the BK skimmers on top of the cup. What do you think?

    Finally, here she is all assembled
    I'm not as think as you stupid I am

  4. #4
    Apprentice
    Join Date
    Jun 2006
    Location
    Nova Scotia Canada
    Posts
    101
    Thanks
    0
    Thanked 0 Times in 0 Posts
    So here it is back in the sump (fashioned from a $7 recycling bin) and running. Notice the lack of a gate valve. You’re eye’s don’t deceive you, it canned it. I found that the flow going into the skimmer came in waves since I hooked it up to the display retune line. This made the water level fluctuate allot in the skimmer with the gate valve controlling it, so I tried taking it off and using the slip pipe that is the standard way of water level control with the ASM’s instead. It worked great and the water level stayed just where I wanted it to. I kept the PVC that I used to hook up the gate valve to use as the exhaust pipe because it keeps things much quieter.


    Here’s basically the same picture but 4 days later. I went away drinking… I mean camping…. For the weekend and came back to find a stinky surprise. A full collection cup! For the first time in my reefing ‘career’! I was pretty pumped, but man does that stuff smell bad.

    Guess it works!
    I'm not as think as you stupid I am

  5. #5
    Apprentice
    Join Date
    Jun 2006
    Location
    Nova Scotia Canada
    Posts
    101
    Thanks
    0
    Thanked 0 Times in 0 Posts
    Here’s what I’ve done today.

    First of all, I found this tube in the garage and I thought it would be perfect for the skimmer venturi intake.

    You can see just by looking at it (on the left) that it has a much wider diameter than the stock ASM venturi tube (the right). By blowing into it I could tell that it will allow much more air into the skimmer. The standard tube was much harder to blow through. It fit nice and snug over the venturi stub.

    And here it is, the topic of much discussion, the bubble diffuser plate. This is a vew of the bottom

    It was pretty easy to make out of acrylic. I used a 1/8” but to drill holes in an acrylic circle I cut on the drill press. I then counter sunk the holes with a round router but that was perfect for the job. I think it looks pretty good, but honestly I wish I put more holes in it. We’ll see how it fares.

    And from the top.

    I glued about ½” of 1 ¼” pvc tube to the top, then rubbed some silicone into the hole which will act as a make shift washer to hold it in place on the 1” tube that points into the cup in the skimmer.
    I'm not as think as you stupid I am

  6. #6
    Apprentice
    Join Date
    Jun 2006
    Location
    Nova Scotia Canada
    Posts
    101
    Thanks
    0
    Thanked 0 Times in 0 Posts
    And here’s the whole assembly put together

    Sorry for the bad pic, but you can just barely make out the diffuser plate sitting on top of the collection cup inside the skimmer. Fit perfectly and was easy to get in. almost as if I knew what I was doing.


    So . I’m posting these pictures literally about 5 minutes after I took them, so the skimmer is just bubbling at the moment. The first thing I notices when I fired it back up was how nicely the bubble seemed to float straight up. The diffuser plate seemed to help further reduce the turbulence in the skimmer. The second thing I noticed was that the bubbles seem to be a bit large. This kind worried me at first because big bubbles are not good in terms of skimmer performance. The holes In the diffuser plate may be a little too big or the new air intake tube may actually be sucking in too much air (is there such a thing?). But as time went on (T+10 minutes now) the bubbles inside the skimmer seem to be around the same size they were before, and there really does seem to be less turbulence in the skimmer. I’m afraid I can’t seem to get a good pic of the bubbles to show you guys (grrrr point and shoot). The final say of weather or not the modifications I made today will stay will be the amount of skimmate the skimmer produces in 24 hours. Around half a cup (average) would be satisfactory, any more and I would be thrilled and recommend these modifications to all G-3 Users.
    I'm not as think as you stupid I am

  7. #7
    Master Reefer Small Fry's Avatar
    Join Date
    Jun 2006
    Location
    Windsor,ON,Canada
    Posts
    791
    Blog Entries
    3
    Thanks
    1
    Thanked 6 Times in 5 Posts
    if the holes in the bubble diffuser were smaller, would that in turn make the bubble themselves smaller?? i don't knwo if you would know but no doubt someone else will. These mods are great ideas if anybody (*looks around*) wants to make their own skimmers, i know a guy on AP.ca that did that out of pvc.

    Very kewl project though
    Josh

    Small Frys 120

    Fish- 1 Percula Clown, Black fin Shrimp Goby

    Clown and Goby are just chilling in the NanoCube 12

    120 almost ready for re-cycle


  8. #8
    Our Brotha Down Unda
    V's Avatar
    Join Date
    Mar 2006
    Location
    Terra Australis
    Posts
    6,773
    Blog Entries
    15
    Thanks
    1
    Thanked 29 Times in 28 Posts
    when u know the dynamics of a skimmers function its good fun tinkering with it!
    good work by the way! bet your learning heaps along the way! if u haven't already id suggest u check out aquatic sysytems engineering by Escobal.
    every question u ask along the way is explained in huge detail. like is there such a thing as to much air!


    Vquilibrium Productions

  9. #9
    Apprentice
    Join Date
    Jun 2006
    Location
    Nova Scotia Canada
    Posts
    101
    Thanks
    0
    Thanked 0 Times in 0 Posts
    Oh cool, thanks Veriann, could you provide a link for our other viewers? (and myself )
    I'm not as think as you stupid I am

  10. #10
    Our Brotha Down Unda
    V's Avatar
    Join Date
    Mar 2006
    Location
    Terra Australis
    Posts
    6,773
    Blog Entries
    15
    Thanks
    1
    Thanked 29 Times in 28 Posts


    Aquatic Systems engineering: Devices and How They Function by P.R. Escobal

    Price:27.95

    Aquatic Systems Engineering: Devices and How They Fuction by P.R. Escobal
    All you need to know about turnover times, filters, sterilizers, reactors, venturis, skimmers, pumps, hydraulics, heat and ozone, presented wherever possible in an east-to-use graphical format, backed up by many worked examples and problems with worked-out answers. 205 pages.

    its a book, not link!
    thats your price by the way, it was twice that for me.


    Vquilibrium Productions

  11. #11
    Curious Reefer
    Join Date
    May 2007
    Location
    Cary, NC
    Posts
    5
    Thanks
    0
    Thanked 0 Times in 0 Posts

    Recycle return hole

    George, How did you modify the return hole on the recycle pump? Mine has a stub that the pump originally attached. That hole is not the right size to run the PVC into the center of the skimmer. Did you cut off the stem and just grind the hole larger to accept 1" pvc?
    Thanks

  12. #12
    Grand Master Reefer CarmieJo's Avatar
    Join Date
    Jan 2006
    Location
    Raleigh, NC
    Posts
    14,980
    Blog Entries
    4
    Thanks
    69
    Thanked 179 Times in 166 Posts
    Hello safedad and to TR.
    Carmie


    Only disasters happen fast!


    Carmie's 54 Corner Tank
    Carmie's Cube


    Show people you value their advice! Click the STAR icon at the bottom of the post to add to their reputation.

  13. #13
    Crispy Reef Monkey **MOD** Phurst's Avatar
    Join Date
    Jan 2007
    Location
    Richmond, Virginia
    Posts
    3,921
    Blog Entries
    3
    Thanks
    5
    Thanked 39 Times in 33 Posts
    Very nice. I have a buddy that is running a modded G4X. he says it really kicks butt!
    **KEEP ME AWAY FROM SUPER GLUE ... i tend to glue my lips shut !!**

  14. #14
    Curious Reefer
    Join Date
    May 2007
    Location
    Cary, NC
    Posts
    5
    Thanks
    0
    Thanked 0 Times in 0 Posts
    Thanks CarmieJo, OSU in NCSU country??

  15. #15
    Grand Master Reefer CarmieJo's Avatar
    Join Date
    Jan 2006
    Location
    Raleigh, NC
    Posts
    14,980
    Blog Entries
    4
    Thanks
    69
    Thanked 179 Times in 166 Posts
    That's my alma mater! Go Bucks!
    Carmie


    Only disasters happen fast!


    Carmie's 54 Corner Tank
    Carmie's Cube


    Show people you value their advice! Click the STAR icon at the bottom of the post to add to their reputation.

  16. #16
    Master Reefer poppin_fresh's Avatar
    Join Date
    Apr 2006
    Location
    Vermont
    Posts
    632
    Thanks
    0
    Thanked 0 Times in 0 Posts
    IMO, recirculating and direct feeding a skimmer are THE best mods that you can do to an ASM. Another popular mod is to replace the needlewheel with mesh...the aptly named mesh mod. The mesh will effectively chop the water/air mixture into a finer state. You may need to do this if you are seeing bubbles that are too large because of the larger tubing.

    Yes a skimmer can pull too much air! If it cant process it into small bubbles, its too much. Thats why we we dont force feed our skimmers with air pumps.

    Also, your skimmate looks a litle watery,. I would adjust for a little drier foam. I cannot see though the skimmate my skimmer makes. It should be like good beer...the darker the better!

  17. #17
    Curious Reefer
    Join Date
    May 2007
    Location
    Cary, NC
    Posts
    5
    Thanks
    0
    Thanked 0 Times in 0 Posts

    Foot print measure

    I am upgrading from a 55 to a 90 gal. I have a ASM G3 with the mesh mod and a gate valve. I vascillating back and forth as to feeding it through the drain or a pump. After doing the recirculation mod what is the new footprint? I am making a new sump to go under the new tank. I will do the recirc mod when I transition into the new setup. Attached are my plans for the sump and plumbing in the tank.
    Thanks,
    Bob
    Attached Files Attached Files

  18. #18
    Grand Master Reefer CarmieJo's Avatar
    Join Date
    Jan 2006
    Location
    Raleigh, NC
    Posts
    14,980
    Blog Entries
    4
    Thanks
    69
    Thanked 179 Times in 166 Posts
    Good news about the upgrade Bob! I am bad with these kind of questions but this should it and get you an answer.
    Carmie


    Only disasters happen fast!


    Carmie's 54 Corner Tank
    Carmie's Cube


    Show people you value their advice! Click the STAR icon at the bottom of the post to add to their reputation.

  19. #19
    Curious Reefer
    Join Date
    May 2007
    Location
    Cary, NC
    Posts
    5
    Thanks
    0
    Thanked 0 Times in 0 Posts

    Latest upgrade

    I completed the recirculation mod. I have since moved the Sedra 5000 pump to the recycle loop. I replaced it with a Sicce PSK 2500 as my infeed pump. My recycle return goes into the skimmer, turns 90 degree and then 45 degrees down. This way it swirls around the outside of the chamber.

  20. #20
    Grand Master Reefer CarmieJo's Avatar
    Join Date
    Jan 2006
    Location
    Raleigh, NC
    Posts
    14,980
    Blog Entries
    4
    Thanks
    69
    Thanked 179 Times in 166 Posts
    How's it working?
    Carmie


    Only disasters happen fast!


    Carmie's 54 Corner Tank
    Carmie's Cube


    Show people you value their advice! Click the STAR icon at the bottom of the post to add to their reputation.

  21. #21
    Curious Reefer
    Join Date
    May 2007
    Location
    Cary, NC
    Posts
    5
    Thanks
    0
    Thanked 0 Times in 0 Posts
    I'm very pleased. It pulls some smelly stuff out routinely. Sometimes the Sicce pump is a little tempermental about restarting. I have used both the mesh and purple impellars but didn't notice much difference.

  22. #22
    Grand Master Reefer rroselavy's Avatar
    Join Date
    May 2006
    Location
    Los Angeles
    Posts
    1,168
    Thanks
    2
    Thanked 2 Times in 2 Posts
    Hmm... I have heard that the Sicce's can sometimes spin backwards and pull less air because of the asymmetrical volute design, but I have not heard of them having problems restarting.

Thread Information

Users Browsing this Thread

There are currently 1 users browsing this thread. (0 members and 1 guests)

Similar Threads

  1. Seaclone Skimmer
    By wwest in forum Filtration
    Replies: 8
    Last Post: 11-21-2006, 07:18 PM
  2. Replies: 8
    Last Post: 08-08-2006, 10:24 PM
  3. Skimmer Question
    By wwest in forum Filtration
    Replies: 34
    Last Post: 07-02-2006, 12:29 PM
  4. Skimmer vs. skimmer vs. skimmer....
    By Reefbaby in forum Filtration
    Replies: 25
    Last Post: 02-21-2006, 01:03 PM
  5. Skimmer Placement
    By Bishop in forum Filtration
    Replies: 12
    Last Post: 01-27-2006, 01:01 AM

Bookmarks

Posting Permissions

  • You may not post new threads
  • You may not post replies
  • You may not post attachments
  • You may not edit your posts
  •