Page 1 of 8 1 2 3 ... LastLast
Results 1 to 25 of 196

Thread: 75g Money Sink

  1. #1
    Grand Master Reefer PhotoJohn's Avatar
    Join Date
    Jun 2007
    Location
    Lakeland, FL
    Posts
    1,312
    Blog Entries
    5
    Thanks
    2
    Thanked 1 Time in 1 Post

    75g Money Sink

    For the last month, two, or three I have been planning, acquiring, and building a 75g reef tank. I have had a 24g nano cube for two years, and a 46g bow front for about a year. I decided I wanted to build a reef tank the right way. Here is my story:

  2. #2
    Grand Master Reefer PhotoJohn's Avatar
    Join Date
    Jun 2007
    Location
    Lakeland, FL
    Posts
    1,312
    Blog Entries
    5
    Thanks
    2
    Thanked 1 Time in 1 Post
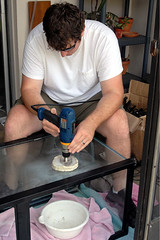
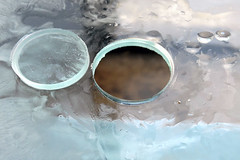
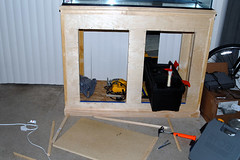
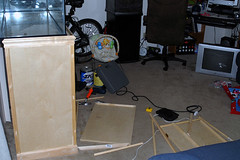
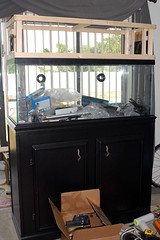
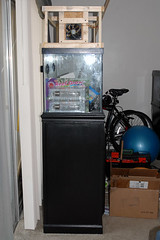
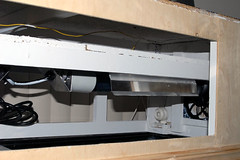
    I purchased a 75g All Glass Aquarium co. tank from someone who had kept bearded dragons in the tank for the nice sum of $100. I was originally going to use the tank as a sump/fuge for my 180g tank, which is now up for sale. My wife doesn't like the giant glass box in our apartment, so we settled on using the 75g. The 75 didn't have any overflows, so I drilled my tank. I researched several websites before drilling and most said that the tank did not have tempered glass sides. The first hole took almost an hour. I was afraid of breaking my tank so I went slow and flushed the area often. Glass-Holes.com dope aquarium stuff was very helpful along with several youtube videos.


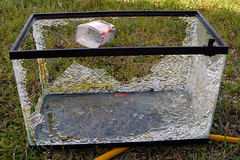
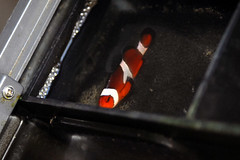
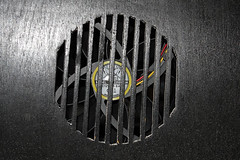
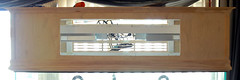
    For anyone who is wondering what happens when you drill tempered glass here is my 10g practice tank:


  3. #3
    Grand Master Reefer PhotoJohn's Avatar
    Join Date
    Jun 2007
    Location
    Lakeland, FL
    Posts
    1,312
    Blog Entries
    5
    Thanks
    2
    Thanked 1 Time in 1 Post
    I live about a mile from Lowe's, so that is where I shop, I believe them to be the Walmart of the hardware world (evil). At any rate I had designed my stand, well I picked a design from several I drew after researching fish tank stands on TR, Geothermal Aquaculture Research Foundation Home Page, and RC, and went to Lowe's to purchase wood. I purchased several 2x6s, and 2x4s. I didn't think to check the wood for straightness when I bought it, wow did I feel stupid about that later. I took the wood back to the saw in Lowe's and asked them to cut the wood for me. They did cut it up and on the last board the guy said "You know this isn't a project saw right!" Apparently he had something better to be doing at 5pm on a Monday night. I suppose he could have been talking in the corner like all his coworkers. So apparently the saw in Lowe's is only there to get the wood cut to a size that will fit into your vehicle, who knew. I got the wood home and began assembling the bottom and top(all 2x6). When I finished the bottom and top I checked for squareness...it was way out. So I measured and checked everything. Several boards had been cut to short, one was twisted enough to pull everything out of square, I almost lost my mind right there. But I pulled myself together and took apart the bottom and top that had just consumed a few hours of my life. The next day I went back to Lowe's, and you thought I learned my lesson, and purchased another 2x6. I cut this one up myself. I got everything back together and it was close enough to square for me, and I am not easy to please. Then I assembled and began installing the 2x4 lengths attaching the bottom and top. I ended up having to cut them all down a little bit simply because the stand was getting to tall.


    The final size of the stand is 40"tall x 48.5" long x 19" wide. It is an imposing bit of furniture now.

    I didn't like the normal height of fish tank stands. I am 6'4" and they just seem a bit low for my tastes. I wanted to make this stand even taller but I was worried about cleaning hassles and getting the center of gravity so high off the ground.

  4. #4
    Grand Master Reefer PhotoJohn's Avatar
    Join Date
    Jun 2007
    Location
    Lakeland, FL
    Posts
    1,312
    Blog Entries
    5
    Thanks
    2
    Thanked 1 Time in 1 Post
    I thought I had more pictures but apparently I either didn't take them or they dissolved into cyberspace.

    I installed several metal L brackets inside the stand to help everything hold together. I think I saw them inside Phurst's stand, but it could have been someone else. I looked through many. I cut paneling to fit the sides and front of the stand and attached it with finishing nails. I built the doors out of MDF (somehow was a bit warped, a big pain) and trimmed them with chair rail and quarter round. The trim was a major headache! I am dreading trimming out the hood. I don't have a power miter saw so I am using a cheap and crappy hand miter saw and plastic box from Lowe's (My bane at this point).


    I don't know how my wife is standing this mess in our living room.


    The doors are not trimmed yet...where is that picture...gone I guess


  5. #5
    Grand Master Reefer PhotoJohn's Avatar
    Join Date
    Jun 2007
    Location
    Lakeland, FL
    Posts
    1,312
    Blog Entries
    5
    Thanks
    2
    Thanked 1 Time in 1 Post
    I have a clown fish in my nano cube that is a jumper. My old room mate dubbed him Houdini after the escape artist. He has been found in the overflow 4 times now, once I thought he was a gonner as he was sucked up against the pump intake. The latest:


    There he is just hanging out

  6. #6
    Grand Master Reefer PhotoJohn's Avatar
    Join Date
    Jun 2007
    Location
    Lakeland, FL
    Posts
    1,312
    Blog Entries
    5
    Thanks
    2
    Thanked 1 Time in 1 Post
    My progress on the 75 has been slow but my wife is encouraging me to finish up. I think she wants her living room back. I also promised to integrate my nano and 46g into this tank...thus opening up more living space for us...and I thought it was the living space for the fish that mattered. Anyway the stand is finished. I sanded, primed, and painted everything inside and out. I am now constructing my hood. It will house 2 175w 15k MH and 2 t5 actinic w/ individual reflectors. I purchased 4 48" t5 lights but only 2 will fit in the hood, sadness. There are two 120mm computer fans blowing into and out of the hood. I put them near the bottom of the hood in hopes of increasing evaporation a bit and cooling the entire hood by blowing directly across the MH bulbs.


    I was wondering would putting a ventilated back piece on the hood increase air flow or is it better to leave it boxed up so the fans can create a current? (They have vents out each side)
    Last edited by PhotoJohn; 06-13-2008 at 03:26 AM.

  7. #7
    Grand Master Reefer PhotoJohn's Avatar
    Join Date
    Jun 2007
    Location
    Lakeland, FL
    Posts
    1,312
    Blog Entries
    5
    Thanks
    2
    Thanked 1 Time in 1 Post
    I have all my lighting installed! It took about a day to get everything buttoned up but it is in. The MH bulbs are about 7"-9" off the surface of the water and the t5 bulbs are as close to the water as I can get about 1-2" I didn't mention it before but the hood is constructed out of 1x2. Finding 1x2 at Lowe's that is even close to straight is a nightmare! I went though what seemed like a pallet to get 4 boards. It took about an hour of searching...

  8. #8
    Grand Master Reefer Amphibious's Avatar
    Join Date
    Feb 2006
    Location
    Ft. Pierce, FL
    Posts
    4,702
    Blog Entries
    1
    Thanks
    3
    Thanked 122 Times in 91 Posts
    Looking good, John. Keep the progress pics coming. When do you think this project will see water?
    Amphibious

    Good Luck comes to those who research and prepare.


    Our Talking Reef Forum The Cultured Reef Forum
    My tank journal Amphibious' 135 mixed reef.
    The Cutured Reef toll free number - 888 745-0449


    Amblyeleotris randalli commonly, Randall's Goby.

  9. #9
    Crispy Reef Monkey **MOD** Phurst's Avatar
    Join Date
    Jan 2007
    Location
    Richmond, Virginia
    Posts
    3,921
    Blog Entries
    3
    Thanks
    5
    Thanked 39 Times in 33 Posts
    Nice progress! Looks like a stout piece of furniture for sure.

    The back of my canopy is open and it totally helps dissipate the heat. If you have a problem with jumpers, you couls always male the rear wall of your canopy out of egg crate. Stops fish, but not air.
    **KEEP ME AWAY FROM SUPER GLUE ... i tend to glue my lips shut !!**

  10. #10
    Grand Master Reefer PhotoJohn's Avatar
    Join Date
    Jun 2007
    Location
    Lakeland, FL
    Posts
    1,312
    Blog Entries
    5
    Thanks
    2
    Thanked 1 Time in 1 Post
    Quote Originally Posted by Amphibious View Post
    When do you think this project will see water?
    After I visit you! I was hoping to come down for the club meeting but that fell through as my mother came into town from PA. It was good to see her but I still need to get some sand from you.

    I also still need to get in touch with Manny for some amazing acrylic overflows. I tried making my own acrylic overflows and it was an utter failure. Apparently it is a bad idea to try to cut acrylic with a jig saw. I also tried a knife but it didn't really work either. So off to Marine Design Systems for me

    I would like it wet within a month.

  11. #11
    Grand Master Reefer PhotoJohn's Avatar
    Join Date
    Jun 2007
    Location
    Lakeland, FL
    Posts
    1,312
    Blog Entries
    5
    Thanks
    2
    Thanked 1 Time in 1 Post
    Phurst, I have always wondered what does FSM mean in your logo?

  12. #12
    Crispy Reef Monkey **MOD** Phurst's Avatar
    Join Date
    Jan 2007
    Location
    Richmond, Virginia
    Posts
    3,921
    Blog Entries
    3
    Thanks
    5
    Thanked 39 Times in 33 Posts
    Quote Originally Posted by PhotoJohn View Post
    Phurst, I have always wondered what does FSM mean in your logo?
    Flying Spaghetti Monster - Wikipedia, the free encyclopedia
    **KEEP ME AWAY FROM SUPER GLUE ... i tend to glue my lips shut !!**

  13. #13
    Grand Master Reefer PhotoJohn's Avatar
    Join Date
    Jun 2007
    Location
    Lakeland, FL
    Posts
    1,312
    Blog Entries
    5
    Thanks
    2
    Thanked 1 Time in 1 Post
    Now that books looks like an interesting bit of satire, the Gospel of the FSM lol

    I have a question for anyone out there:

    Have any of you ever wired in a computer fan that had a yellow along with red and black wires? I tried doing nothing with the yellow wire but no spin spin. I though it is probably a ground but how exactly should I wire that given the power converter only has red and black.

  14. #14
    Crispy Reef Monkey **MOD** Phurst's Avatar
    Join Date
    Jan 2007
    Location
    Richmond, Virginia
    Posts
    3,921
    Blog Entries
    3
    Thanks
    5
    Thanked 39 Times in 33 Posts
    Red should be 12v, black should be neutral, and the tellow will either be 3v on varible speed fans or possibly the RPM signal wire to tell the computer how fast the fan is spinning. It SHOULD work just using the red and black. Are you sure the power converter is 12v and has enough amps (or miliamps) to drive the fan?
    **KEEP ME AWAY FROM SUPER GLUE ... i tend to glue my lips shut !!**

  15. #15
    Grand Master Reefer PhotoJohn's Avatar
    Join Date
    Jun 2007
    Location
    Lakeland, FL
    Posts
    1,312
    Blog Entries
    5
    Thanks
    2
    Thanked 1 Time in 1 Post
    The fan is 12v .041amp and the converter is 12v500ma

  16. #16
    Grand Master Reefer PhotoJohn's Avatar
    Join Date
    Jun 2007
    Location
    Lakeland, FL
    Posts
    1,312
    Blog Entries
    5
    Thanks
    2
    Thanked 1 Time in 1 Post
    I got the fans working. I read that the converter wire with the writing was the Red/hot wire and the wire without the writing was the black. This was backward with my fans/converter. I changed the wires over and yes, there was wind.

    I also finished painting the inside of my hood (still needs side panels). I got a deal on a small container of paint at Lowe's. Someone had some flat white mixed up and left it, so i got it for $3.50.
    Last edited by PhotoJohn; 06-20-2008 at 12:37 AM.

  17. #17
    Grand Master Reefer Amphibious's Avatar
    Join Date
    Feb 2006
    Location
    Ft. Pierce, FL
    Posts
    4,702
    Blog Entries
    1
    Thanks
    3
    Thanked 122 Times in 91 Posts
    Hey John,

    Just got another 100 bags of Pure AragoniteSand. So, come on over.

    Dick
    Amphibious

    Good Luck comes to those who research and prepare.


    Our Talking Reef Forum The Cultured Reef Forum
    My tank journal Amphibious' 135 mixed reef.
    The Cutured Reef toll free number - 888 745-0449


    Amblyeleotris randalli commonly, Randall's Goby.

  18. #18
    Grand Master Reefer PhotoJohn's Avatar
    Join Date
    Jun 2007
    Location
    Lakeland, FL
    Posts
    1,312
    Blog Entries
    5
    Thanks
    2
    Thanked 1 Time in 1 Post
    Thank you Dick!

    I will give you a call when I can make the trip. It should be soon

  19. #19
    Expert Reefer thesaent14's Avatar
    Join Date
    Aug 2006
    Location
    miami florida
    Posts
    492
    Thanks
    0
    Thanked 0 Times in 0 Posts
    hey john i see the holes on the back of the tank but i need to see a close up so i can beter idea


    thanks

    manny
    acrylic guru

  20. #20
    Grand Master Reefer CarmieJo's Avatar
    Join Date
    Jan 2006
    Location
    Raleigh, NC
    Posts
    14,980
    Blog Entries
    4
    Thanks
    69
    Thanked 179 Times in 166 Posts
    John, it is looking good. The (rather tall) guy I bought my sand and rock from had his tank on a tall stand and it was stunning.
    Carmie


    Only disasters happen fast!


    Carmie's 54 Corner Tank
    Carmie's Cube


    Show people you value their advice! Click the STAR icon at the bottom of the post to add to their reputation.

  21. #21
    Assistant Moderator Skurvey Dog's Avatar
    Join Date
    Sep 2006
    Location
    Charleston, SC
    Posts
    1,900
    Thanks
    5
    Thanked 6 Times in 5 Posts
    Lol John! When I first started reading your built I seriously could relate to your woes of trial and errors! I felt like a salmon struggling up stream to spawn, but would never actually get there. Loved the visuals along the way. It's all those set backs and curve balls that make one feel like they have finally accomplished something! 
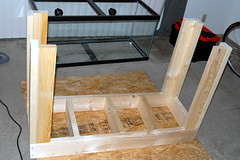
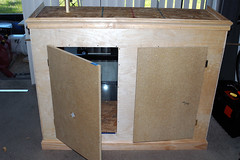
From my small experience with "power tools", the correct blades for materials being cut and using masking tape to prevent fractures means everything. And please don't forget to use safety goggles or glasses as those nerdy looking safety precautions in rare circumstances can make you one thankful individual. Looks like you did a jam up job on your stand and I must say.... that wife of yours is a keeper! And the best part is that you can tell everyone that "I did it myself!" Yeahhhhhhhhh!


    Will your voice count?
    One new reefer, another voice united with the many against ignorance and greed. Educate, influence, good stewardship, all in one accord to work together as a whole in saving our reefs.

    "Get Reefy With It!"

  22. #22
    Grand Master Reefer PhotoJohn's Avatar
    Join Date
    Jun 2007
    Location
    Lakeland, FL
    Posts
    1,312
    Blog Entries
    5
    Thanks
    2
    Thanked 1 Time in 1 Post
    I have been trying to finish up this hood. Living in an apartment (bottom floor) makes working difficult. I work till 12am or there about and when I get home my neighbors don't like hammering at 1 am. Nevertheless here are some new pictures of the progress.

    This took me FOREVER!!! If i had the "proper" tools it wouldn't be so bad but doing it with a jig saw took well over an hour, it may have been two or more. I was busy cutting and sweating to death in the FL heat so I didn't really keep track. This is the back side cover. I wanted to "vent" it to help cool the tank.


    These are the side panels. It took atleast 1hr per panel. I cut them with the jig saw as well.


    I put these handles on the bottom doors. I thought the "wave" handle fit the fish tank look


    Here is the "door" in the hood. Well there is no door per say yet but I almost have it ready to hang. I have (2) 175w MH bulbs 8-9" off the water surface and (2) 48" t5 bulbs set up in the bottom.


    EDIT:
    The bigger the door the better. My door is large but still far to small to do much other than feed the fish
    Last edited by PhotoJohn; 01-06-2009 at 03:22 AM.

  23. #23
    Grand Master Reefer PhotoJohn's Avatar
    Join Date
    Jun 2007
    Location
    Lakeland, FL
    Posts
    1,312
    Blog Entries
    5
    Thanks
    2
    Thanked 1 Time in 1 Post
    Here is what the hood looks like now. The only thing left to do is sand, prime, and paint.


    I couldn't figure out how to cut this trim right for the corner till I was almost out of trim. I cut all the top trim and then had to re-cut it. Thus i had to splice in a few pieces. I have glued and filled these add ons. After I prime and paint them if it doesn't look right I am going to buy more trim and redo it. I am hoping glue and filler will work

  24. #24
    Grand Master Reefer PhotoJohn's Avatar
    Join Date
    Jun 2007
    Location
    Lakeland, FL
    Posts
    1,312
    Blog Entries
    5
    Thanks
    2
    Thanked 1 Time in 1 Post
    The stand is now sanded and I am priming it now. I think the splices will look fine. If you know they are there you could probably find them but they are far from obvious thankfully. I discovered when sanding rounded molding it is much easier to sand if you rap the sand paper around a scrap bit or quarter round.

    Manny does this picture help?


    Also Manny will the RO filters on your website work for any standard RO unit? Do you also carry DI beads?

  25. #25
    Grand Master Reefer CarmieJo's Avatar
    Join Date
    Jan 2006
    Location
    Raleigh, NC
    Posts
    14,980
    Blog Entries
    4
    Thanks
    69
    Thanked 179 Times in 166 Posts
    John,

    Nice neat work! I like the wavy handles.
    Carmie


    Only disasters happen fast!


    Carmie's 54 Corner Tank
    Carmie's Cube


    Show people you value their advice! Click the STAR icon at the bottom of the post to add to their reputation.

Page 1 of 8 1 2 3 ... LastLast

Thread Information

Users Browsing this Thread

There are currently 1 users browsing this thread. (0 members and 1 guests)

Similar Threads

  1. 75g FOWLR looking to become a DIY monster!
    By bbl_nk in forum Member Tank Projects
    Replies: 29
    Last Post: 05-29-2009, 05:22 PM
  2. 75g stand
    By IAreef in forum DIY Projects
    Replies: 8
    Last Post: 01-21-2008, 08:04 AM
  3. Ocean Nutrition Formula One Pellets SINK
    By john0087 in forum General Fish Discussion
    Replies: 6
    Last Post: 11-07-2007, 12:30 AM
  4. New 75g up and running...
    By chazlightning in forum Member Tank Projects
    Replies: 25
    Last Post: 10-03-2007, 07:51 PM
  5. #17 money saving tips
    By dreams in forum Podcast Follow-ups
    Replies: 11
    Last Post: 04-28-2006, 09:34 PM

Bookmarks

Posting Permissions

  • You may not post new threads
  • You may not post replies
  • You may not post attachments
  • You may not edit your posts
  •