Page 1 of 24 1 2 3 11 ... LastLast
Results 1 to 25 of 592

Thread: Wildeone's Newest Obsession

Hybrid View

Previous Post Previous Post   Next Post Next Post
  1. #1
    Grand Master Reefer wildeone's Avatar
    Join Date
    Apr 2006
    Location
    Central Ohio
    Posts
    1,030
    Thanks
    0
    Thanked 0 Times in 0 Posts

    Wildeone's Newest Obsession


    Note: While searching the Forums at Reef Central,e I came across a link to Talking Reef. I logged on and really liked the format and the fact that the podcasts allowed me to listen while at work (don't tell the boss). Originally I started posting my journal on Reef Central, but I decided that I want to post and continue it here and make this my home base for all things reef related.

    Now I dont have any problem telling anyone that I am an absolute newbie to this hobby, but I am a fast learner and an all around tinkerer. I love to tweek on things and solve issues, thats what drew me to this hobby. All of the information and items that I have used thus far, I gained knowledge of online. I am sure, as with anything online, I will find my share of misinformation, but my hope is to achieve a successful reef system, get smarter and of course help the next guy.

    So without hesitation here begins my journey:

    The Desire
    I started wanting a FOWLR tank several years ago. Finances finally picked up, a new LFS moved close to work and I stopped by during lunch and BAM, I decided to get one.

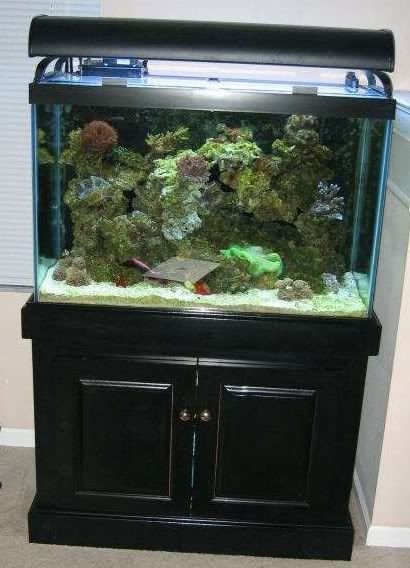
    I started researching online all about the hobby. After reading a long thread (50+ pages) on another site I decided a Nano Cube was for me. I then read about the cracking problem, the difficulty of mods, so I searched Ebay for a used setup in my area (local pickup only auctions don't draw a crowd). I was lucky enough to find a 65G that was only 5 months old, the previous owner upgraded to a 100G. It came with the tank, Current USA Orbit HQ lights, and a stand.

    Here is a photo of it from E-bay:


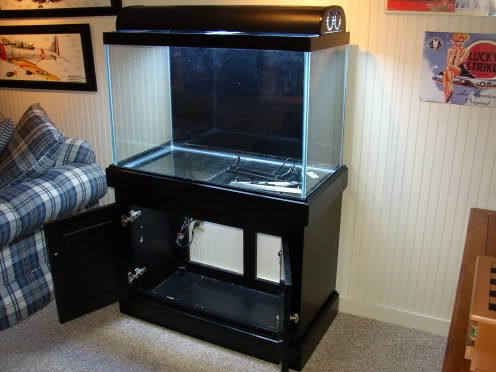
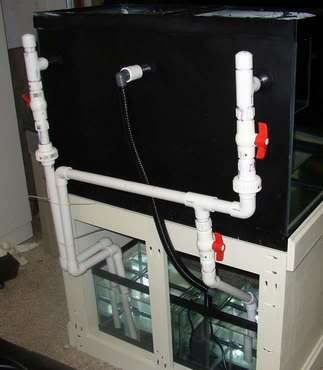
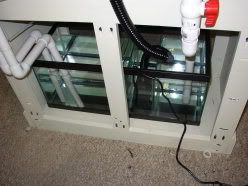
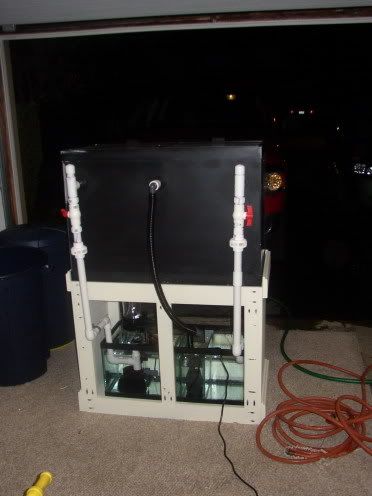
    And here is a photo of the unit after I got it home:


    Leak Test
    I filled it up with H2O and did a 48 hour leak test. No leaks were present, so I drained the unit and tried to figure out what to do next.

    More to follow...
    Last edited by wildeone; 04-27-2006 at 10:34 PM.

  2. #2
    Grand Master Reefer gwen_o_lyn's Avatar
    Join Date
    Oct 2005
    Location
    NW GA
    Posts
    2,824
    Thanks
    0
    Thanked 0 Times in 0 Posts
    Try hosting your pics here on TR since RC doesn't allow those pics to be linked here

    Glad this will be your new home

  3. #3
    Master Reefer Scott's Avatar
    Join Date
    Jan 2006
    Location
    Grand Forks, ND
    Posts
    747
    Thanks
    0
    Thanked 0 Times in 0 Posts
    Wildeone, first WELCOME! And congrats on being the 500th member!

    Quote Originally Posted by wildeone
    Note: Originally I started posting my journal on Reef Central, but I decided that I want to post and continue it here and make this my home base for all things reef related.

    So glad that you were able to join the family here.
    Tank setup 8-5-05
    26 gal bowfront

    click sig to see my tank and 'tankcam'


  4. #4
    Grand Master Reefer wildeone's Avatar
    Join Date
    Apr 2006
    Location
    Central Ohio
    Posts
    1,030
    Thanks
    0
    Thanked 0 Times in 0 Posts

    What next...

    I did more research online and found out that most folks have a sump included in their setup. The sump is used to add total water volume to your system, thus diluting swings in ammonia, nitrites and other chemicals in the water. In addition it makes a great place to stash all of the ugly stuff needed to sustain life in a reef, like heaters, pumps, filtration, etc. I am sure there are other reasons to have a sump, if you know of a couple more, please post it.

    Most sumps include a refugium, a place to put algae and other living things you don't want in you main tank, but would like to have benefit the water quality. I am not an expert (yet) on sumps or refugiums, and I am sure someone here can list (and I hope they do) all of the benefits and drawbacks. I decided that the pros I read about outweighed the cons, so I decided to include one in my setup.


    Refugium / Sump
    After reading for about a week on the principals of sumps and refugiums, and being a DIY type of guy, I drew up plans for my refugium, and decided it would go under the tank in the stand. I purchased a 20G long tank (30x12x12) which fit nicely below. I had no idea of how hard it would be to decide what type of setup I wanted. It amazed me that there were so many different ways to setup a tank and there were about three times as many opinions of which setup is best. I finally decided to construct my own using the aforementioned tank and 1/8" glass from the local hardware (not the best idea, read on).

    I researched what gear I would need to put in the refugium / sump and found out that I had no idea what a protein skimmer was. I read that some people had them, and some people didn't. The main benefit is that they remove proteins before nitrifying bacteria break them down into nitrates. With less waste to process, the bacteria consume less oxygen. Higher oxygen levels and low nitrate levels mean better health for your aquarium life. I had enough in my budget to afford a basic skimmer, and after looking around I settled on a Turbofloter 1000.

    Pumps are another item that everyone has an opinion on. How much flow, what type, what brand? I followed some advice I found on Melev's Reef. I designed my setup with 3 times to five times the volume of the display running through the sump. I decided I would need a minimum of 325 GPH (before head loss ) to achieve this. The only issue is, I didn't figure out the head loss thing until after I purchased a Eheim 1250 pump. With my head loss I would be lucky to get 200 GPH through it.

    I read both good and bad things about Rio pumps, and since I am on a budget I chose the start with them. I could always justify an upgrade in 6 months. I purchased a 2100 to go with my skimmer and a 2500 to circulate my sump. I needed to heat my water, so I ordered (2) 250 Watt heaters. This way if one fails I have a backup.

    I got measurements online for the skimmer and pumps and drew up my refugium plans. I would use three nine inch tall baffles, one inch apart with the middle baffle one inch higher then the other two.
    I was told these are to remove micro bubbles that come out of the skimmer, and since I have never seen a skimmer work, I just have to believe it. These measurements came from Melev's Reef ]Melev's Reef[/url] on the sump page. The design I worked up had the refugium on the left the sump on the right and the return to the tank in the middle. The divider that separated the refugium from the return was 10", giving the refugium a little more space, because I read to make it as large as I could.


    1/8" glass and a bad measurement

    I went to the local hardware and picked up 4 pieces of 1/8" glass, I had it made 11-7/8 wide. I got home and attempted to install the glass dividers. My measurements were too close and I had to use a little force to get the glass in. The first piece finally went in and I used silicone to seal around it, but it was a tight fit. I went to the hardware, kicking myself along the way for making my measurements too tight, and got a glass cutter tool. I attempted to shave 1/8" off of the glass, and actually succeeded, although it was not easy. I installed the other panes of glass and sealed them up. I also included a little box for the hose to fit into and put some LR.

    The next day I filled the sump and tested for leaks, none present so we were good to go (so I thought).


    Check out my cool 1970's almond refrigerator in the background. Ahh it's a basement bar who cares!
    Last edited by wildeone; 06-27-2006 at 12:22 PM.

  5. #5
    Grand Master Reefer wildeone's Avatar
    Join Date
    Apr 2006
    Location
    Central Ohio
    Posts
    1,030
    Thanks
    0
    Thanked 0 Times in 0 Posts
    Gwen_o_lyn - Thanks for the info, I tried to save a litte time and as usual that leads to trouble! I got PhotoBucket running and I am correcting now.

    Scott - Thanks for the welcome mat, and I am pleased to be the 500th member!

  6. #6
    Grand Master Reefer wildeone's Avatar
    Join Date
    Apr 2006
    Location
    Central Ohio
    Posts
    1,030
    Thanks
    0
    Thanked 0 Times in 0 Posts

    My stuff arrives in the mail

    I received my skimmer, Rio Pump for the skimmer and my Eheim 1250 for circulation. I quickly realized that my measuring skills were again lacking, as there is no way that the skimmer will fit into the skimmer section of my refugium. It is lacking a good 3". It was a terrible feeling, thinking I had done my research, and then realizing that the footprint of the skimmer was the skimmer only, not the pump as well.

    I decided to remove the three baffles and move them closer to the refugium end. I had set my skimmer in the skimmer section to get a measurement and when I went to pull it out, the top fell off, hit the rim of the tank and the glass broke right at the first baffle, the baffle I forced into place, I guess the stress was too much. ARRGHHH I was mad.

    So, I guess I didn't need to move the baffles, I needed a new tank. My wife was very pleased at these new developments. She already had a funny look in her eye staring at all of this equipment laying in the living room. I went to the LFS the next day and got another tank and decided to try again.

    I went with the same setup, refugium on the left, skimmer right and return in the middle. This time I got 1/4" glass and I had it cut to 11-3/4", no need to make it so tight, the silicone does all the work.

    My refugium was much smaller, only 8x12, but I really had no other choice due to space. I leak tested it and no leaks once again. I love silicone!

    Here is a photo of the latest Refugium.


  7. #7
    Grand Master Reefer wildeone's Avatar
    Join Date
    Apr 2006
    Location
    Central Ohio
    Posts
    1,030
    Thanks
    0
    Thanked 0 Times in 0 Posts

    How to get the water from the display to the sump.

    When I got my 65G, it had no holes in it. After reading about the various types of external overflows and the benefits of internal overflows, I chose to have my tank drilled. The decision was an easy one for me, but getting it drilled would prove to be a tougher task.

    I wanted to put 1" bulkheads into the back of the tank as the bottom was tempered. I chose to go with 2 overflow lines and one return. I called every glass shop in town and they all told me the same thing, "never done that before." A LFS said they would do it...for $50 a hole. I could order the tank new with 2 holes and an internal box for $190.

    I couldn't decide what to do, I had already broke a 20G tank, my wife would kill me if I broke the 65. I like to live life on the edge, so I read all about drilling glass online. I ordered my bits form Ebay and they arrived from Hong Kong in about a week.

    I followed the guidelines set by others online, drilling slow, using water, not forcing it and taping the backside. After about 10 minutes I had my first of three holes, and after an hour I was completely finished. You will notice I used a drill guide or jig ( I really have no idea what it is called, I borrowed it from work). It helped me to keep the bit on track so it didn't skip across the glass. I held it down with plumbers putty.


    That's my dad drilling it, I figured if it broke I could tell my wife he did it!


    Close up of the drill guide thingie!


    Close up of a hole.

    Next, to overflow box or not to overflow box...

  8. #8
    Grand Master Reefer wildeone's Avatar
    Join Date
    Apr 2006
    Location
    Central Ohio
    Posts
    1,030
    Thanks
    0
    Thanked 0 Times in 0 Posts

    Overflows

    I had some reservations on putting overflows in my tank. I really wanted to keep it as simple as possible and I thought the internal overflows would take up alot of space. I started my research online:

    Many people said boxes were necessary, a few said they run without them. Most that had them preached of the good efgects of skimming the surface water. Many who didn't have them complained about look of the boxes in the tank. I decided to comprimise, I called a local glass shop and ordered $16 worth of grey glass, cut to size to make two 6x4x8 boxes. Smaller boxes instead of none at all.

    Testing my plumbing skills
    (hard for an electronic guy)

    I had a design for my plumbing in mind when I cut the holes, but I had no confirmation that that design would work. I read online and learned about Dursos, Stockmans and every other type of piping sytle. I decided I would use a little of this and a little of that. So I installed the flow boxes, piped up the overflow lines with external durso's and a turned down 90 in each. I turned the return line up 90 and out 90 with the top 1/8" just above the supposed waterline.

    Here is what it looked like:


    I quickly learned something, I mounted the boxes too high, My water was so close to the top that the the glass lids were wet. ARRGHH! I had borrowed (stolen) a measurement fron a site that sold flow boxes, but theres had teeth. So the top of thees was at the same height as mine, but there teeth were much lower. It's kind of scarey to think about, but in my daily job I am in charge of the lives of many people, and I make an idiot move like that building a tank! Oh well better the tank then the people I guess...

    Up next...balancing the system....and my budget!

  9. #9
    Master Reefer Scott's Avatar
    Join Date
    Jan 2006
    Location
    Grand Forks, ND
    Posts
    747
    Thanks
    0
    Thanked 0 Times in 0 Posts
    The pics look great!
    Tank setup 8-5-05
    26 gal bowfront

    click sig to see my tank and 'tankcam'


  10. #10
    Grand Master Reefer gwen_o_lyn's Avatar
    Join Date
    Oct 2005
    Location
    NW GA
    Posts
    2,824
    Thanks
    0
    Thanked 0 Times in 0 Posts
    A skimmer is something you really need and it's best never to "skimp on the skimmer." I am not familar with that brand, but brand names are a big factor when it comes to skimmers. If you buy an ok skimmer now, you will be replacing it soon. Don't waste your money if the skimmer isn't very good- just get the good one now.

    Flow- are you saying your total flow in the top of your tank is 200 gph? If that's the case you don't have nearly enough. You want about 15 tanks per hour which is about 1000 gph. Consider adding a Tunze- they are expensive, but well worth it. Do read up *again* on the rio pumps- read too many fire stories on those, but also heard they make them better now.

    Heater- Another item where brand is important. What kind? I read so many threads about tanks getting cooked, and although no heater is safe without a controller, I wouldn't trust any brand except the Ebo Jag- I think Rob agrees with me on that. Very smart buying 2 heaters though. I'm pretty sure my 72g is heated with one 250w heater and that could cook your tank- just so you are aware.

    Great decision on the sump- that's the only way to go! Sorry about all your troubles though building it, but the final product looks excellent!

    Great pics too!

  11. #11
    Site Owner Rob's Avatar
    Join Date
    Jan 2005
    Location
    Michigan
    Posts
    9,845
    Thanks
    1
    Thanked 3 Times in 3 Posts
    Wildeone,
    welcome, and thanks for sharing.. lets see if i can get some of these questions.. there were a lot, so if i miss any, just let me know

    protein skimmers, yes, they are a great things to have, required IMO..
    sumps/regugium.. same thing here.. IMO, they are must have..

    regarding the RIO pumps.. all of the known issues surround the older RIO pumps. the new RIO + plus models were supposed to have resolved those issues.
    the other thing is to my knowledge these issues are only with the larger 2100 and up RIO pumps.

    and just on a final note, it might be easier to post questions in another thread that way this can maintain as a journal, and others can find the answers to the questions you asked...

    im not really picky on this stuff, so its just a recommendation..

    thanks again, for sharing with u...
    Show people you appreciate there advice, click the icon under there name and give them Reputation points


  12. #12
    Site Owner Rob's Avatar
    Join Date
    Jan 2005
    Location
    Michigan
    Posts
    9,845
    Thanks
    1
    Thanked 3 Times in 3 Posts
    awesome thread, thanks.. its great..

    one comment, you might want to re-think the glass lids..
    there are two issues with them
    they trap heat, and they inhabit good surface gas exchange..
    Show people you appreciate there advice, click the icon under there name and give them Reputation points


  13. #13
    Grand Master Reefer wildeone's Avatar
    Join Date
    Apr 2006
    Location
    Central Ohio
    Posts
    1,030
    Thanks
    0
    Thanked 0 Times in 0 Posts
    Thanks for the flow info Rob.

  14. #14
    Master Reefer pham411's Avatar
    Join Date
    Jan 2006
    Location
    a
    Posts
    676
    Thanks
    0
    Thanked 0 Times in 0 Posts
    looking nice wild.
    much luck
    ********
    |*****\\ARRRRRR//*****|

  15. #15
    Master Reefer kj_yoda's Avatar
    Join Date
    Dec 2005
    Location
    Georgia
    Posts
    621
    Thanks
    0
    Thanked 0 Times in 0 Posts
    Wildone... A big welcome to the TR community. This tank journal is great! Keep up the good work. That tank is looking great

  16. #16
    Grand Master Reefer wildeone's Avatar
    Join Date
    Apr 2006
    Location
    Central Ohio
    Posts
    1,030
    Thanks
    0
    Thanked 0 Times in 0 Posts
    Thanks for all the compliments and the welcomes too.

    Balancing the System

    As noted inmy last post, my overflow boxes were too high, my water was lapping the top glass. I also noticed a huge amount of noice in my sump area and bubble coming up from the left drain line. That noise had to be eliminated or it would drive me crazy.

    I thought that the modified dursos that I installed would eliminate noise in the system, but actually after further reading I realized that it just shifted the noise to the sump. After tinkering for a bit I came to realize that if I plugged the durso hole, thus eliminating it and adjusted the flow on the drain lines down a bit the system was much quieter, but not silent. I finished out the night removing my boxes andmoving them down to 7/8" below the lip.

    I did some online research and found a thread at RC describing a similar setup to mine where the overflow would be used as I have, the other drain was raised 1/8" above the lip of the box and used as an emergency drain, and the drain flow was controlled via a valve. I also read where you could put a tee on the end of the drain line in the sump with one end of the tee in the water and the other facing up and that would eliminate much of the bubble noise.

    I went home and did some hillbilly engineering and ran a quick test (I feel like the mythbusters guys). I extended one drain above the boxes by 1/8" and installed the tee in the sump. I opened the emergency drain valve full tilt and throttled the other one to get a good level in the overflow box. All of the sudden everything went silent, the experiment worked! The fan on my pc is louder than the tank. I am so pleased.

    So, now I have drawn up the following plan and I need to replumb my tank and remove one of the overflow boxes.

    The reason I am teeing my main drain line is so I can control the flow in the fuge section and still have a bunch of flow in the skimmer section. I have read on several occasions that you don't want full flow through the fuge and you don't want your fuge to flow into your skimmer section and kill all the good critters.

    Here is what I hope to have it all look like:


    Next step, testing the new plumbing...

  17. #17
    Grand Master Reefer gwen_o_lyn's Avatar
    Join Date
    Oct 2005
    Location
    NW GA
    Posts
    2,824
    Thanks
    0
    Thanked 0 Times in 0 Posts
    Wow- awesome thread!! The DIY stuff just amazes me!

  18. #18
    Grand Master Reefer JustDavidP's Avatar
    Join Date
    Jan 2006
    Location
    Marlborough, MA - USA
    Posts
    2,387
    Thanks
    0
    Thanked 0 Times in 0 Posts
    Um...yer a newbie? I wish I had "newbies" like you to help this old "Salty Dawg" with his projects

    Welcome aboard. Great project. Even better information.

    Thanks!

    Dave
    ><((((º>`·.¸¸.·´¯`·.¸.·´¯`·...¸><((((º>
    ·´¯`·.¸. , . .·´¯`·.. >((((º>

    "Fins to the left...Fins to the Right, I'm going home to play with my reef tonight..."

    If you're looking for me, and I'm MIA from the board, email me at JustDavidP (at) gmail (dot) com.

    Experience in aquaria, 37 years. Experience in marine, 22+ years. Experience in Reef Keeping, 8 years. Always a newbie!

  19. #19
    Grand Master Reefer wildeone's Avatar
    Join Date
    Apr 2006
    Location
    Central Ohio
    Posts
    1,030
    Thanks
    0
    Thanked 0 Times in 0 Posts
    Wow thanks folks, I appreciate the compliments!

    I did a little more experimenting tonight. I removed the emergeny extension and let the 2nd overflow box act like a normal overflow box. So basically I had a system with 2 overflows and 1 return. One overflow is restricted by the valve and the other is full tilt. Everything is quiet and stable. Now I am second guessing reworking the plumbing like it is above. I may be able to keep it as it is.

    It's a tough choice, what to do...

  20. #20
    Grand Master Reefer gwen_o_lyn's Avatar
    Join Date
    Oct 2005
    Location
    NW GA
    Posts
    2,824
    Thanks
    0
    Thanked 0 Times in 0 Posts
    Do keep us posted! This thread is like reality TV with so many twists and surprises!!

  21. #21
    Apprentice jeepjon's Avatar
    Join Date
    Feb 2006
    Location
    Cleveland, Ohio
    Posts
    139
    Thanks
    0
    Thanked 0 Times in 0 Posts
    Great thread! I like the detail and the information on how you've done everything. Good to know for those of us who've had bad experiences delving into the realm of "sumped systems" (I still don't like them...but maybe later I'll try to figure them out).
    Thanks for sharing!
    -Jon

  22. #22
    Grand Master Reefer wildeone's Avatar
    Join Date
    Apr 2006
    Location
    Central Ohio
    Posts
    1,030
    Thanks
    0
    Thanked 0 Times in 0 Posts
    Well, after much testing I think I finally settled on a piping plan. I decided to go with 2 overflows and no emergency overflow. I made sure that one of the overflow valves stays completly open, and the other is throttled back. One other key is that the overflow that is wide open has the durso holw open, theother is plugged. I have zero water noise. The hum of the flourescent fixutres in the garage is louder.

    Here is a photo of the final plumbing plan. I decided to keep the ball valves, but if I was to do it all over I would use gate and probably plumb it like the drawing above.


    I actually don't exactly know what to do next. Tomorrow my other pump should be in and then I can hook up the skimmer and get it going. I just got my RO system temped in and I am filling a 35 gallon trash can tonight. Tomorrow, after the skimmer test, I will use the RO water to clean the tank and all piping.

    Anyone have any info I should know about cleaning the tank. Thanks!

  23. #23
    Insightful Reefer fishcounter's Avatar
    Join Date
    Feb 2006
    Location
    Utah
    Posts
    197
    Thanks
    0
    Thanked 0 Times in 0 Posts
    wildone,
    Welcome to the Talkingreef! I just wanted to drop a line to say hello and that the tank looks great so far. I have been away on vacation for a while so this is my first time chiming in on this thread. Sorry if it's a bit long. I'm also new in the hobby and I'm going through the same processes. I'm really impressed with the thought you have put into the tank and look forward to hearimg more about it.

    The only suggestion I have, since I don't know much about the hobby yet is to be patient in everything and make sure that you get the best equipment you can for the fish and other animals you're going to keep. I can't imagine watching my tank crash becasue my skimmer or pump gave way. So, we might be able to save some money now on equipment but it might cost us everything in the future. I feel really strongly about this beacuse we are pulling most of these lovely animals awayfrom their homes in the ocean for our enjoyment and so its our obligation to give them the best environments that we can. So keep up the research, you're doing great. Also, an example of good equipment saving us money is that some brands are better designed to reduce the use of electricity...yea!!!!! Who wants to give more money to the power companies than we need to? Thats a cost that usually gets pushed to the side when we plan our tanks.

    Also, do you know what you would like to keep in the tank? I remember when I started planning my reef in January my entire system changed 3 times just because I began to realize what environment my fish and coral would need to not only survive, but thrive? If you haven't got a list yet, make one. It was eye opening for me. As a matter of fact, my list keeps changing. I am by no means a rich man so saving for my tank is taking a long time, which has actually been really good for me. It has allowed me to do a lot of research on the hobby and get this fish list sorte3d out. I am not nearly as far into completing my tank yet, but I will be there one day!

    The other thing that I have learned is that each animal is different. Its feeding habits, its care, etc. I am sure you know this already, but the systems we design should cater to the animals needs and not be based solely on what equipment we buy. I guess that is why there is no right way to keep a reef system. Everyone has their opinions because the are all keeping different animals with different needs. So, its important that we know exactly what we want to keep in our tanks and then design the tank around that. Fore example, some fish are messier than others and will require a really good skimmer to keep the water clean. I get really caught up in how my system will "fit" together and sometimes I forget to ask myself if I am designing my system for the tomato clown and bubble tip anemone that I want to take care of. Once again welcome!!!!
    - Eddy

    "Corals require an aquarium, seawater at the right temperature and salinity, waterf flow, light, food, bicarbonate/buffer, and calcium. Period. No other equipment, apparatus, magic potions, pills, voodoo, prayer, or other sacrafices are necessary." -Eric Borneman

  24. #24
    Grand Master Reefer wildeone's Avatar
    Join Date
    Apr 2006
    Location
    Central Ohio
    Posts
    1,030
    Thanks
    0
    Thanked 0 Times in 0 Posts
    Thanks for the kind words and information. I truly can appreciate the "take your time approach". I have been researching for a few months and as you can see I just now have the tank to sump piping done. I have friends and relatives that keep asking..."ya got any fish yet?" The looks on there faces are priceless when I tell them that I will have some in 6 to 9 months...

    That brings up a few good questions that I think I will post elswhere regarding when to introduce fish. I will stop back here and throw a link to them so we can all follow along.

    I have not actually thoroughly thought out the livestock issue. I have read alot on www.wetwebmedia.com about different reef species and selections. One real goo introduction article is here: http://www.wetwebmedia.com/reeflvst.htm

    I have given thought that I would like to taylor my tank after a specific region of reef such as indo-pacific or carribean, but I am having a little trouble gathering all of my information. Once again I will post a few questions elsewhere and link back to here. Here is the link posted elswhere in the forums as promised.

    I do appreciate your input and will steer my efforts towards determining the livestock I am going to put in the tank. I have all the time in the world, I look at it like I look at my investments...a little homework up front will save a lot of money (in this case dead livestock) in the future:? .

    Later!
    Last edited by wildeone; 04-06-2006 at 11:29 AM.

  25. #25
    Grand Master Reefer wildeone's Avatar
    Join Date
    Apr 2006
    Location
    Central Ohio
    Posts
    1,030
    Thanks
    0
    Thanked 0 Times in 0 Posts
    Tonight I finished breaking down the tank and cleaning it thoroughly. I did the same to my 20 gallon fuge and all piping. I had about 25 gallons of fresh RO, so I made my very first patch of SW and it is currently heating and mixing with a powerhead running in the trash can.

    My next step is to make the second batch of SW and get it ready to go in the tank. In the meantime, I slapped another coat of paint on my stand and topped that with a coat of gloss polyurethane. One more coat and it will be ready to place.

    My plan (I guess) is to place the stand and tank, fill, with SW and test it. How long do I have to wait to put in the LR assuming my salinity is OK? What other tests do I need to run? I will link to these questions that I will post in the general forums.


    Related links:
    http://www.talkingreef.com/forums/showthread.php?t=695
    Last edited by wildeone; 04-07-2006 at 03:29 PM.

Page 1 of 24 1 2 3 11 ... LastLast

Thread Information

Users Browsing this Thread

There are currently 1 users browsing this thread. (0 members and 1 guests)

Bookmarks

Posting Permissions

  • You may not post new threads
  • You may not post replies
  • You may not post attachments
  • You may not edit your posts
  •