Results 1 to 23 of 23

Thread: JayBeDriften's 45 gallons of Ocean. (Photograph Intensive)

  1. #1
    Master Reefer JayBeDriften's Avatar
    Join Date
    Jul 2006
    Location
    Bronx, New York
    Posts
    690
    Thanks
    0
    Thanked 0 Times in 0 Posts

    JayBeDriften's 45 gallons of Ocean. (Photograph Intensive)

    Hello everyone, I know that I have been away again for alittle bit of time but I haven't forgotten my spot on the Reef. I have been taking care of some personal matter concerning my wife and baby in the making as well as finding time to play with my Reef Aquarium. I wanted to start this thread as an active journal and online display for my 45 gallon Cube SPS Dominant Reef Aquarium in the making. I hope you enjoy swimming through this thread and as always any comments and suggestions and contstructive criticism are always welcome.

  2. #2
    Master Reefer JayBeDriften's Avatar
    Join Date
    Jul 2006
    Location
    Bronx, New York
    Posts
    690
    Thanks
    0
    Thanked 0 Times in 0 Posts
    Providing Not Just An Aquarium But A Piece Of The Ocean

    One thing that every male Reef Aquarium enthusiast is either an understanding girlfriend/fiance/wife to allow him to spend his life savings on recreating a piece of the ocean in their home. I just am so happy to have married not only the woman of my dreams but to have married an animal lover that knows no limits of protecting those that are most precious to this planet. (Helps out that she is halfway to becoming a Veterinarian.) I have had many aquariums with many sets of problems and I have decided that future endeavors from now one would be completely thought out and planned accordingly to provide not just a suitable home where my inhabitants can survive but a replica of their natural environement so that they can thrive!

    My wife pleasently pointed out that if I love my Reef Aquarium so much and that I'm always saying I have the ocean in our home why does it look like a poluted landfill littered with equipment such as Heaters and Powerhead. She advised that I could spend a reasonable amount of money on upgrades to my Reef Aquarium as long as I maintained our budget and didn't eat into our child's college money. (Sorry son..... but I spent your first year tuition on a Starphire Aquarium.) I think that was pretty reasonable of her and decided to site in front of my Reef wondering what should I upgrade first.


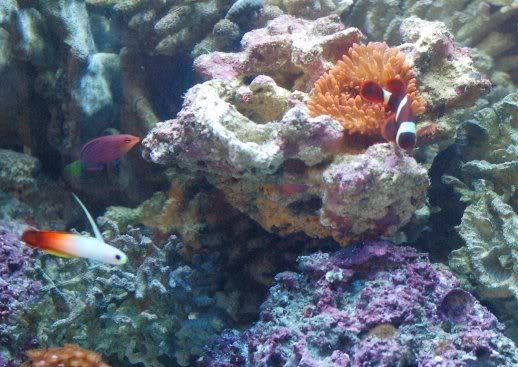
    Photograph - This is what my Reef Aquarium looked like back in February 2007.

  3. #3
    Master Reefer JayBeDriften's Avatar
    Join Date
    Jul 2006
    Location
    Bronx, New York
    Posts
    690
    Thanks
    0
    Thanked 0 Times in 0 Posts
    Lighting Upgrade..... Packing The Sun Into A Small Box

    Having Metal Halide Lighting Systems is great and it provides all sorts of benefits when you have an open canopy design working for you. Heat dissapates farely quickly and you have easy access to maintaining your equipment, replacing bulbs, etc. However, when you live in a Studio apartment with your wife and you are both trying to take a catnap during the mid hours of the day and find that you are always facing the opposite direction and the aquarium and wake up with a suntan I would definitely say their some room for adjustment. Especially when your wife says that the sun called and said it had a monopoly until I came along. So I decided that I should plan to build my first closed canopy design. I penciled a small schematic of what the finish product should look like and off to Home Depot I went. After picking up some supplies, working for about 3 hours on piecing together the closed canopy and wiring the Metal Halide Lighting System for about 1 additional hour. Safely say that we were finished.

    Improvements
    • My wife and I can now sleep during the middle of the day in our apartment without trying to cause a blackout for sleep.
    • Much more light is being concentrated within the aquarium as oppossed to lighting up our apartment.
    • Design of the aquarium hood allows for an additional Metal Halide Lighting System to be mounted in the future.
    • Fish can no longer Carpet Dive.
    New Problems
    • Increased heat within the hood is causing the Reef Aquarium water temperature to increase about 2 degrees Fahrenheit during the course of the day.

    Photograph - Before Photograph February 2007.


    Photograph - After Photograph with new enclosed canopy housing two 150 watt Metal Halide Lighting Systems with Electronic Ballast and 20,000k HQI Bulbs.


    Photograph - Small cutout to accomodate the overflow since I do not have a Reef Ready Aquarium.


    Photograph - Two 150 watt Metal halide Lighting Systems with Electronic Ballast and 20,000k HQI Bulbs. I still have room for another 150 watt, 250 watt or 400 watt, what do you think?
    Last edited by JayBeDriften; 05-19-2007 at 05:57 AM.

  4. #4
    Master Reefer JayBeDriften's Avatar
    Join Date
    Jul 2006
    Location
    Bronx, New York
    Posts
    690
    Thanks
    0
    Thanked 0 Times in 0 Posts
    Trying To Beat The Heat

    Well my aquarium normally ran at 75.0 degrees Fahrenheit before the Lighting System upgrade. Now it runs at a range of 77.5 degrees Fahrenehit to 78.2 degrees Fahrenheit. This is a big range to increase and I'm not sure any of my inhabitants appreciate it one bit. I was currently using a 11 hour photoperiod with both Metal Halide Lighting System on simultaneously. I have modified that photoperiod so that I have 1 Metal Halide Lighting System on for 8 hours during the day and the other on for 4 hours in the middle of the 8 hour period to give a high noon effect. I also has installed a small desk fan just behind the Closed Canopy to draw cool air across the surface of the water and inside the canopy. This modification has decreased the total amount of heat and my aquarium may reach a maximum of 77.3 degrees Fahrenheit.
    Last edited by JayBeDriften; 05-19-2007 at 07:11 AM.

  5. #5
    Master Reefer JayBeDriften's Avatar
    Join Date
    Jul 2006
    Location
    Bronx, New York
    Posts
    690
    Thanks
    0
    Thanked 0 Times in 0 Posts
    Let Clean Up The Aquarium A Bit..... Canister Filter to Sump Conversion

    Originally my Reef Aquarium was setup with a Fluval FX5 Canister Filter which I know is against all things reef related. However, when we moved in it was a rush and there was not alot of space so at the time it seemed okay to do. This lead to me having to disconnect the Canister Filter every two weeks to perform water changes and to clean it out to prevent a build up of excess detritus that would eventually effect overall water quality. On top of the I had very large hosing taking up a vast majority of real estate within my Reef Aquarium. It was also not very pleasing to the eye when looking inside the aquarium to see hosing, heaters and power heads. So I decided that an upgrade was need.

    I purchase a Pro Clear Aquatics Wet/Dry Trickle Filter and converted it to a sump that would house my Protein Skimmer, Heaters, Return Pump and an additional Thermometer for water temperature averaging. I also purchased the new model Overflow since my aquarium is not Reef Ready. (The new model Overflow is so much quieter then the old models.) Setup was a breeze but was originally done by using the Flex Tubing for the return line. This was replaced two weeks ago when I decided to actually plumb some PVC Piping for a return to the aquarium with a distributed "L" brace within the aquarium and Ball Joint Valve for easy cutoff.

    Improvements
    • PVC Piping does not allow algae to grow and slow water flow as did the Transparent FlexTubing.
    • Plum an optional cutoff valve used during feeding time to maintain food within the Main Display for extended periods of time.
    • Profesional look which make me look like a pro when friends and family come over.
    • Less equipment in the Main Display providing a more natural look Reef Aquarium.
    New Problems
    • None as of yet..... I will let everyone know when the PVC Plumbing starts leaking water!

    Photograph - Before Photograph Fluval FX5 Canister Filter.


    Photograph - After Photograph Pro Clear Aquatics Wet/Dry Trickle Filter converted to a sump with PVC Plumbed return.


    Photograph - Ball-Valve for cut-off during feeding time for extended food exposure.
    Last edited by JayBeDriften; 05-19-2007 at 07:36 AM.

  6. #6
    Master Reefer JayBeDriften's Avatar
    Join Date
    Jul 2006
    Location
    Bronx, New York
    Posts
    690
    Thanks
    0
    Thanked 0 Times in 0 Posts
    Time For Some Stability

    Well for every action their is a reaction and when you install a fan to blow air across the surface of the water that means that the reaction is inreased evaporation. I found myself manually adding RO/DI Freshwater to my sump about twice a day and it was getting a bit time consuming. I also was concerned with the stability of my salinity level and increased stress to my inhabitants being that my water volume is not very large. So I ordered a Do-It-Yourself Automatic Top-Off Kit from AquaHub.com, a Tom's Aqualifter External Pump, an Extension Cord, Electrical Tape and a large Food Grade Rubbermaid Container to act as the RO/DI Freshwater reseior. After about 1 hour of piecing together the Automatic Top-Off kit, another 10 minutes attaching hoses and refilling my sump to adjust for the Float Switches height. Everything was working great. SPECIAL NOTE: Remember to place your return line above the resevior and pump as to prevent a syphon and you overdosing your Freshwater.

    Improvements
    • Stabalized salinity level which remains at 1.025 SG.
    • I only have to fill the container once every day as oppossed to two or three times before. I will eventually get a larger Resevior for the RO/DI Freshwater to limit the refilling.
    New Problems
    • I just need to remember to disconnect the power to the Automatic Water Top-Off unit when performing water changes.

    Photograph - RO/DI Freshwater Resevior and Tom's Aqualifter External Pump Autmatic Top-Off kit.


    Photograph - Float Switches positioned within my sump. One is for the water level a Snail/Slosh Gaurd and the second above is an overflow Cut-Off.


    Photograph - Tom's Aqualifter External Pump plumbed into the Rubbermaid Resevior.


    Photograph - Return line positioned inside the overflow to ensure enough height to prevent a Syphon and enough flow to mix properly with the saltwater.

  7. #7
    Master Reefer JayBeDriften's Avatar
    Join Date
    Jul 2006
    Location
    Bronx, New York
    Posts
    690
    Thanks
    0
    Thanked 0 Times in 0 Posts
    Removing The Unsightly Power Head Pollution

    Well even though the majority of equipment has been relocated to the sump I still have about 4 powerheads (Two Maxi-Jet 1200 models and two Marineland Penguin 1140 Models) inside the aquarium poluting the view as my wife would say. I am aiming to have an SPS Dominant Reef Aquarium and flow is a high factor for ensuring the well being of these Corals however, these four Power Heads rated at an average of 295 GPH each were barely cutting it. I needed something that would not only create the necessary water flow but would also be visually pleasing as well. The answer: Eco Tech Marine VorTech Propellor. I have heard nothing but amazing reviews concerning this pump and at a price tag averaging around $345.00 it better perform like a god's gift to mankind! I decided after confirming with the Mrs. to place an order with MarineDepot.com and it just arrived yesterday (Friday, May 18, 2007).

    I ripped open the package and gazed at this aquatic marvel and could not wait to see what it could do. I removed all four of the existing powerheads and the water in my aquarium was stiller then a mime. I followed the directions scraping clean an area on the back pane of the aquarium just underneath the overflow where I wanted to place it. With assistance of my wife holding one end and I the other once near each other the magnetic coupling latched an and presto the setup was almost complete. I wired the speed controller which has an open slot for the backup batter with I definitely will order since my apartment like to pop a breaker once a month. I fired it up and just watched in amazement as this thing warmed up. In just a few minutes detritus from all over the aquascaping of the aquarium was being lifted up and I could see random flow patterns and surface agitation that amazed me. This is a definite Christma gift for any tank no matter the size. I would purchase another one but it is really not necessary, more of a luxury I would say!

    Improvements
    • Increased flow throughtout the entire aquarium which should results in even better maintained water quality since detritus is not allowed to settle.
    • Increased suface agitation for more efficient gas exchange.
    • Decreased aquarium water temperature due to the motor being externally coupled by a magnet wich results in the chiller having to work less.
    • Overall coolness factor of being the big boy in the Reefing Community Block.
    • Free's up more space within the aquarium by not having to clutter Power Head inside. Also looks more visually stimulating. My wife loves it!
    • Reduced the overall electrical wattage consumption by an average of 120 watts which should make my landlord happy.

    New Problems
    • Figuring out how to pay the Credit Card bill.

    Photograph - Before photograph of four littering Power Heads.


    Photograph - Eco Tech Marine VorTech Propellor speed controller mounted just under neath my Reef Aquarium stand.


    Photograph - Eco Tech Marine VorTech Propellor mounted on the back pane of the aquarium just underneath the Overflow.


    Photograph - Reef Aquarium front view with no Power Heads.


    Photograph - Reef Aquarium side view with no Power Heads.
    Last edited by JayBeDriften; 05-19-2007 at 05:46 PM.

  8. #8
    Grand Master Reefer CarmieJo's Avatar
    Join Date
    Jan 2006
    Location
    Raleigh, NC
    Posts
    14,980
    Blog Entries
    4
    Thanks
    69
    Thanked 179 Times in 166 Posts
    Jay,

    Looking good. I think the black canopy is more visually appealing, helping focus your eye on the tank instead of the light.
    Carmie


    Only disasters happen fast!


    Carmie's 54 Corner Tank
    Carmie's Cube


    Show people you value their advice! Click the STAR icon at the bottom of the post to add to their reputation.

  9. #9
    Master Reefer JayBeDriften's Avatar
    Join Date
    Jul 2006
    Location
    Bronx, New York
    Posts
    690
    Thanks
    0
    Thanked 0 Times in 0 Posts
    Quote Originally Posted by CarmieJo View Post
    Jay,

    Looking good. I think the black canopy is more visually appealing, helping focus your eye on the tank instead of the light.
    Thank you CarmieJo. That is exactly what my wife side after I completed the project.

  10. #10
    Master Reefer JayBeDriften's Avatar
    Join Date
    Jul 2006
    Location
    Bronx, New York
    Posts
    690
    Thanks
    0
    Thanked 0 Times in 0 Posts
    Water Temperature Update

    Well after heading back home from work I was eager to monitor the temperature throughout the day to see if my theory of removing the powerheads would actually allow the water temperature to be maintained at is normal 75.0 degrees Fahreneheit mark. On average the Reef Aquarium water temperature stays within a range of 75.0 degrees Fahreneheit through 75.4 degrees Fahrenheit with an occasional spike to 76.1 degrees Fahrenheit when we are in the kitchen cooking.

    Below are links to the Youtube.com website that is hosting a small video that I took this afternoon of my Reef Aquarium using my Microsoft LiveCam. Not the greatest quality but I wanted to give you an idea of the amount of flow that the Eco Tech Marine VorTech Propellor is making. Just take a look at my Pulsating Xenia.


    Last edited by JayBeDriften; 05-19-2007 at 07:27 PM.

  11. #11
    Master Reefer JayBeDriften's Avatar
    Join Date
    Jul 2006
    Location
    Bronx, New York
    Posts
    690
    Thanks
    0
    Thanked 0 Times in 0 Posts
    Upgrading The Sun With Electrical Conservation In Mind

    Well as you may all know I am aiming on mantaining an SPS Dominant Reef Aquarium which requires more lighting then normal is I am to bring out the beautiful colors to an intesity that just catches the eye! However, there are some hurdles that require some special attention. My electrical is included within my rent so its great that I don't have to pay the electrical bill but my apartment is wired in such a way that my landlords apartment is tied into it and about once every month we manage to pop a 20 amp breaker. This means that half of my studio apartment is without power and it is usually the hald to where my Reef Aquarium is plugged into. How is that for Murphy's Law!

    I am currently running two 150 watt Metal Halide Electronic Ballast HQI Retro-Fit kits from HelloLights.com with 20,000k XM Bulbs and would like to start this upgrade by adding a another 250 watt Metale Halide Electronic Ballast HQI Retro-Fit kit with a 20,000k XM Bulb. I have never had any problems with the Hello Lights Ballast but if the Icecap Inc Ballast are more energy efficient I may end up eventually converting all Ballast to Icecap Inc. But from the information gathered on both units from the website it doesn't seem like a big difference. As always your comments, concerns and suggestions are always welcome.

    Questions And Concerns
    • Are Icecap Inc. Electronic Ballast the most energy efficient without sacrificing lighting intensity Ballast on the market. What are your thoughts and/or personal experiences with them?
    • Is it possible to use a lower wattage Bulb such as a 150 watt bulb on a 250 watt Ballast or will their be damage to the Bulb, Ballast or both?
    Ballast Comparison Based On Online Information

    Hello Lights Ballast Specifications

    Ballast Type: 250 watt Electronic Metal Halide HQI
    Energy Savings: 25% energy savings
    Lamp Flicker: Reduced Lamp Flicker
    Lamp Current: 2.2 Amps
    Lamp Voltage: 120 Volts A/C
    Power Factor: > 90%
    Lamp Crest: < 1.8
    Warranty: 3 year warranty
    Price: $99.95

    Icecap Inc. Ballast Specifications

    Ballast Type: 250 watt Electronic Metal Halide HQI Ballast
    Energy Savings: 10% energy savings
    Lamp Flicker: NoneLamp Current: 2.1 Amps
    Lamp Voltage: 120 Volts A/C
    Power Factor: > 92%
    Lamp Crest: < 1.8
    Warranty: 3 year warranty
    Price: $124.99
    Last edited by JayBeDriften; 05-20-2007 at 01:19 AM.

  12. #12
    Grand Master Reefer CarmieJo's Avatar
    Join Date
    Jan 2006
    Location
    Raleigh, NC
    Posts
    14,980
    Blog Entries
    4
    Thanks
    69
    Thanked 179 Times in 166 Posts
    Well they are pulling about the same amps so if you add another you are going to have over 6 amps just in ballasts. If you are already popping breakers adding more amps will just exacerbate the problem. Any chance you can move other things to another circuit?

    The heading energy savings is not helpful; 10&#37; or 25% compared to what??

    I don't know about MH but with PC's you use the same bulb for both 55 & 65w. The difference is the ballast.

    Maybe you should consider the new Solaris 400w (equivalent) fixture. It would draw far less power leaving you more "oops" room.
    Carmie


    Only disasters happen fast!


    Carmie's 54 Corner Tank
    Carmie's Cube


    Show people you value their advice! Click the STAR icon at the bottom of the post to add to their reputation.

  13. #13
    Master Reefer keyozoxmfc's Avatar
    Join Date
    Sep 2006
    Location
    Bay Area, California
    Posts
    679
    Thanks
    0
    Thanked 0 Times in 0 Posts
    very nice jay! i wish you the best of luck with your new lights!

    was your ato easy to set up? i was planning on buying the jbj set just because its plug and play. and it has the pump protection
    -Mark

    Tank Journal

    All Cows Smoke Grass.
    That is why we have HIGH GRADE milk.

    I've Got More Grams Than Teddy
    and don't worry, be hyphy

  14. #14
    Master Reefer Small Fry's Avatar
    Join Date
    Jun 2006
    Location
    Windsor,ON,Canada
    Posts
    791
    Blog Entries
    3
    Thanks
    1
    Thanked 6 Times in 5 Posts
    Somethins i making me think im gonna be needing one of those ATO setups, with all the stuff im going to have going on in my tank...

    Anywho, im amased at your proggress jay, and i had no idea those props were magnetic, but ive seen what they can do, ym favorite LFS has two of those keeping a pair of 2 foot long clams happy, so they gotta be good for something

    Astounding change man, the hood is very nice, looking forward to seeing other changed you will no doubt make
    Josh

    Small Frys 120

    Fish- 1 Percula Clown, Black fin Shrimp Goby

    Clown and Goby are just chilling in the NanoCube 12

    120 almost ready for re-cycle


  15. #15
    Master Reefer JayBeDriften's Avatar
    Join Date
    Jul 2006
    Location
    Bronx, New York
    Posts
    690
    Thanks
    0
    Thanked 0 Times in 0 Posts
    Quote Originally Posted by keyozoxmfc View Post
    very nice jay! i wish you the best of luck with your new lights!

    was your ato easy to set up? i was planning on buying the jbj set just because its plug and play. and it has the pump protection
    The Do-It-Yourself Automatic Top-Off Kit was extremely easy to put together and it only cost about $45.00 to $55.00 total. It also features a safety float should too much water be dosed into aquarium. I would personally recommend the Do-It-Yourself kit which would allow you some extra money to purchase a backup pump since Automatic Top-Off kits are notorious for killing pumps do the high on-off mechanism of the device. But this is just my personal opinion.

  16. #16
    Master Reefer JayBeDriften's Avatar
    Join Date
    Jul 2006
    Location
    Bronx, New York
    Posts
    690
    Thanks
    0
    Thanked 0 Times in 0 Posts
    Quote Originally Posted by CarmieJo View Post
    Well they are pulling about the same amps so if you add another you are going to have over 6 amps just in ballasts. If you are already popping breakers adding more amps will just exacerbate the problem. Any chance you can move other things to another circuit?

    The heading energy savings is not helpful; 10&#37; or 25% compared to what??

    I don't know about MH but with PC's you use the same bulb for both 55 & 65w. The difference is the ballast.

    Maybe you should consider the new Solaris 400w (equivalent) fixture. It would draw far less power leaving you more "oops" room.
    Well I blew another breaker last night and was without power for about 2 hours since my landlord decided to go out of state and had to have a friend come over to let us into the side of the house with the breaker. I definitely needed that battery backup. But non the less my aquarium is back in action. I just removed the Air Conditioner from the Circuit were about 75 percent of all my electrical devices are plugged into and I run a heavy duty extension cord to another outlet on a completely different circuit. I personally don't like the appearance of the Solaris system's even thought they have some nice features that are included along with it. There is just something special about Metal Halide Lighting that cannot be duplicated as of yet.
    Last edited by JayBeDriften; 05-25-2007 at 04:50 AM.

  17. #17
    Master Reefer keyozoxmfc's Avatar
    Join Date
    Sep 2006
    Location
    Bay Area, California
    Posts
    679
    Thanks
    0
    Thanked 0 Times in 0 Posts
    but my worry is more of keeping the pump from running dry. does it have that? and did you follow the exact instructions they gave you for the setup?
    -Mark

    Tank Journal

    All Cows Smoke Grass.
    That is why we have HIGH GRADE milk.

    I've Got More Grams Than Teddy
    and don't worry, be hyphy

  18. #18
    Master Reefer JayBeDriften's Avatar
    Join Date
    Jul 2006
    Location
    Bronx, New York
    Posts
    690
    Thanks
    0
    Thanked 0 Times in 0 Posts
    Quote Originally Posted by Small Fry View Post
    Somethins i making me think im gonna be needing one of those ATO setups, with all the stuff im going to have going on in my tank...

    Anywho, im amased at your proggress jay, and i had no idea those props were magnetic, but ive seen what they can do, ym favorite LFS has two of those keeping a pair of 2 foot long clams happy, so they gotta be good for something

    Astounding change man, the hood is very nice, looking forward to seeing other changed you will no doubt make
    Thank you for the compliments Small Fry. They mean alot to me. I do put alot into this aquarium and I think that just taking your time and thinking things out does so much more help then compulsivness. The Automatic Water Top-Off kit was very inexpensive and yeilds so many benefits. You should definitely look into it.

  19. #19
    Master Reefer JayBeDriften's Avatar
    Join Date
    Jul 2006
    Location
    Bronx, New York
    Posts
    690
    Thanks
    0
    Thanked 0 Times in 0 Posts
    Quote Originally Posted by keyozoxmfc View Post
    but my worry is more of keeping the pump from running dry. does it have that? and did you follow the exact instructions they gave you for the setup?
    Keyozoxmfc, I followed the instructions to the T and unforunately is does not have a function that shuts the pump off should the Freshwater Resevior run dry. But in my opinion you can save yourself the money and just increase the size of your resevior which I personally intend on doing since I have to refill my resevior every day now since the weather is getting warmer and my Reef Aquariums evaporation pattern has increased.

  20. #20
    Master Reefer JayBeDriften's Avatar
    Join Date
    Jul 2006
    Location
    Bronx, New York
    Posts
    690
    Thanks
    0
    Thanked 0 Times in 0 Posts
    My Hypothesis For Getting Back Into Equilibrium

    I took some water sample readings from my Reef Aquarium on Monday and decided to skip my weekly water change in an attempt to get my Calcium and Magnessium levles under control. Caclium readings came back at 780 PPM ad Magnesssium readings according to my Salifert Test Kit were at the maximum of the test 1500 PPM. All other parameters were within their recommended ranges and based on the percentage of my water changes and the ability these weekly changes diluted the amount of Calcium and Magnessium lead me to believe that I would have a better change at lowering them by just skipping a water change and allowing the system to naturally deplete what it needs. I have another water changed scheduled for Memorial Day so I will test before and see if my hypothesis is correct.

    Complete Water Quality Test Readings Monday, May 21, 2007

    Average Temperature: 74.65 degress Fahrenheit
    Salinity: 1.025 SG
    Alkalinity KH (Carbonate Hardness): 10 dKH
    Calcium: 780 PPM
    pH: 8.2 pH
    Magnesium: 1500 PPM (Maximum reading on the Salifert Test Kit.)
    Ammonia: 0 PPM
    Nitrite: 0 PPM
    Nitrate: 0 PPM
    Last edited by JayBeDriften; 05-25-2007 at 06:26 PM.

  21. #21
    Grand Master Reefer CarmieJo's Avatar
    Join Date
    Jan 2006
    Location
    Raleigh, NC
    Posts
    14,980
    Blog Entries
    4
    Thanks
    69
    Thanked 179 Times in 166 Posts
    Jay,

    This will be an interesting experiment. I would also encourage you to test your levels before you do the water change and right after. That way you can see how much of these minerals the tank is using (the change from the last test to the test before the water change) and how much you reduce immediately through a water change.

    Here is what I think but I would be curious to know if my conjecture is correct. I am only going to use Ca in this example because you really don't know what the Mg level is. I am going to use your current level of Ca and presume that you are using a salt like IO that is not Ca enriched.

    When you do a water change you are removing water at 780 PPM and replacing it with water at 350 PPM, a 45% reduction. If you do a 10% water change I think you should see a reduction of about 4.5% immediately following a water change or an overall tank reading of 745PPM.

    If you don't mind doing the tests twice I would love to know if my logic is correct.
    Carmie


    Only disasters happen fast!


    Carmie's 54 Corner Tank
    Carmie's Cube


    Show people you value their advice! Click the STAR icon at the bottom of the post to add to their reputation.

  22. #22
    Master Reefer JayBeDriften's Avatar
    Join Date
    Jul 2006
    Location
    Bronx, New York
    Posts
    690
    Thanks
    0
    Thanked 0 Times in 0 Posts
    Quote Originally Posted by CarmieJo View Post
    Jay,

    This will be an interesting experiment. I would also encourage you to test your levels before you do the water change and right after. That way you can see how much of these minerals the tank is using (the change from the last test to the test before the water change) and how much you reduce immediately through a water change.

    Here is what I think but I would be curious to know if my conjecture is correct. I am only going to use Ca in this example because you really don't know what the Mg level is. I am going to use your current level of Ca and presume that you are using a salt like IO that is not Ca enriched.

    When you do a water change you are removing water at 780 PPM and replacing it with water at 350 PPM, a 45% reduction. If you do a 10% water change I think you should see a reduction of about 4.5% immediately following a water change or an overall tank reading of 745PPM.

    If you don't mind doing the tests twice I would love to know if my logic is correct.
    CarmieJo..... I be more then happy to test twice and I will post the results immediately after today's water change. However I don't think that I will have to worry about getting my water quality back into it natural equilibrium because my wife and I have found a huge 2 bedroom apartment in the Throgs Neck section of the Bronx which means that I need to prepare for a tank breakdown and move as of June 15, 2007. Which means bigger apartment bigger aquarium.

  23. #23
    Grand Master Reefer CarmieJo's Avatar
    Join Date
    Jan 2006
    Location
    Raleigh, NC
    Posts
    14,980
    Blog Entries
    4
    Thanks
    69
    Thanked 179 Times in 166 Posts
    The new apartment sounds great Jay! Breaking my tank down and moving it from one room to another was a major job. One house to another has to be even more difficult. On the other hand, I saw no repercussions in my water chemistry from the tank move even though a section of the sandbed got disturbed when we put the water back in.
    Carmie


    Only disasters happen fast!


    Carmie's 54 Corner Tank
    Carmie's Cube


    Show people you value their advice! Click the STAR icon at the bottom of the post to add to their reputation.

Thread Information

Users Browsing this Thread

There are currently 1 users browsing this thread. (0 members and 1 guests)

Bookmarks

Posting Permissions

  • You may not post new threads
  • You may not post replies
  • You may not post attachments
  • You may not edit your posts
  •