Page 1 of 4 1 2 3 ... LastLast
Results 1 to 25 of 80

Thread: Jim's(bubbletip) 156g SPS Dominant Tank

  1. #1
    Insightful Reefer bubbletip's Avatar
    Join Date
    Aug 2006
    Location
    Chicago
    Posts
    198
    Thanks
    0
    Thanked 0 Times in 0 Posts

    Jim's(bubbletip) 156g SPS Dominant Tank

    Well, I have finally finished cycling my new 156g SPS Dominant Reef Aquarium. I planned for a couple months while waiting for delivery of the tank and time waiting on construction of a custom stand and canopy made of pine. The cost of the aquarium itself was expensive, but the canopy and stand were quite reasonable. Matt of Sho Tank Aquariums in Mundelein, IL set me up nice. He made the stand 36" to the glass from the bottom of the stand and the canopy is 20" from the top to the water. I really like this route because I was able to get the stand and canopy just the way I wanted it. No, I did not build it myself. It was $700 which I feel is pretty cheap considering the quality and the equal cost to Oceanic's offering. I feel best trusting those that know how to brace a couple thousand pounds with that part of set up. I did stain the stand and canopy myself in honey pine only to help Matt out because he is certainly a busy guy. I also needed it for a specific weekend to get some expert plumbing help. Something I also trust to those that know how to make things work the way you want it. I am really excited again to get this new project started. I hope you enjoy the thread
    "Jim" - always learning


  2. #2
    Insightful Reefer bubbletip's Avatar
    Join Date
    Aug 2006
    Location
    Chicago
    Posts
    198
    Thanks
    0
    Thanked 0 Times in 0 Posts

    and away we go...

    A little over a year ago I took down my 65g reef tank that had been going for eleven plus years. I downgraded to a 30g cube to house the first two marine fish I had ever kept, my two captive bred clownfish. Due to space reasons - girlfriend was not as into the tanks at the time - I concentrated on this 30g cube that has been going a bit more than a year. It is now a thriving reef tank of its own and my clowns could not be happier. I caught the bug again and started looking around for my dream tank.

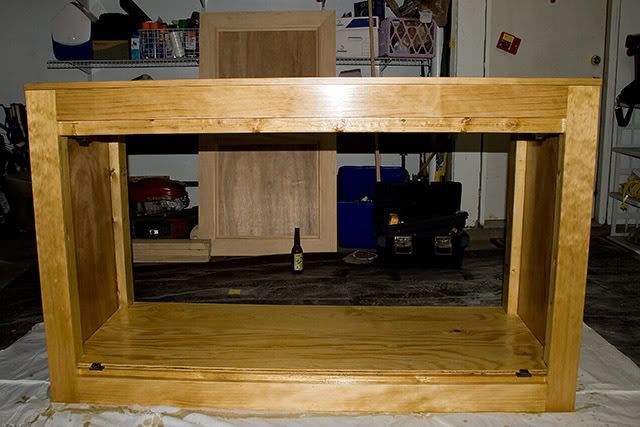
    I stopped into one of my favorite LFS's just north of my work - Sho Tank Aquariums. Matt had an unfinished 120g All-glass tank set into a beautiful custom stand and canopy that were actually connected. It looked really cool.

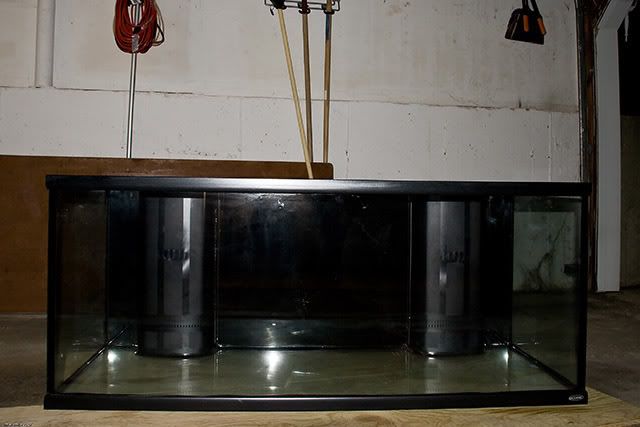
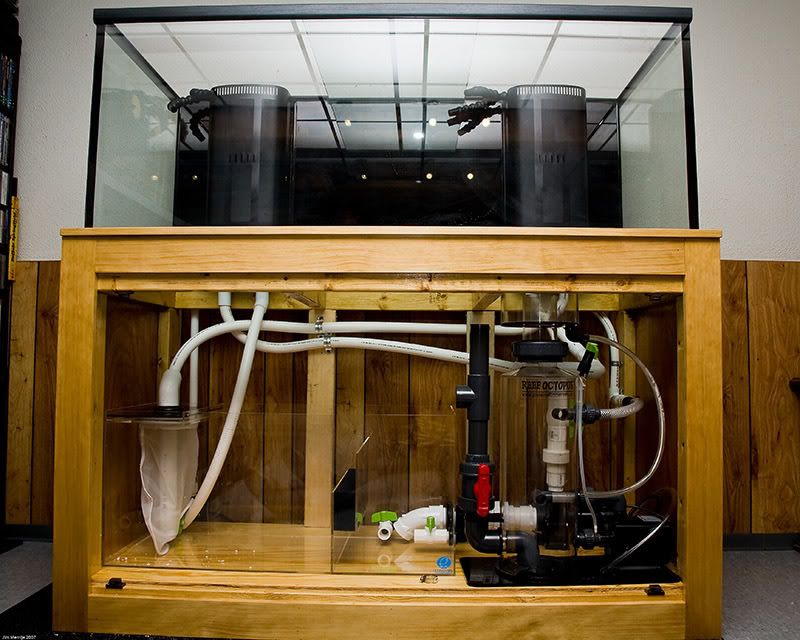
    I took a picture and brought it home to my girlfriend and she wanted it just as much as me. I was totally shocked and we decided to go up to see Matt the next day. I wanted a Starphire front so we asked on the price of a 120g Oceanic and found it was the same price as the 156g Oceanic. So that's what we decided on - our new 156g Aquarium:

    "Jim" - always learning


  3. #3
    Insightful Reefer bubbletip's Avatar
    Join Date
    Aug 2006
    Location
    Chicago
    Posts
    198
    Thanks
    0
    Thanked 0 Times in 0 Posts

    the start of a new beginning...

    It took about 3 weeks to get the tank in and then we waited another 4 weeks for the stand and canopy. In the process, I started plannig out the tank and how everything would work from circulation to lighting and of course, the choice of inhabitants.

    When researching lighting I came across a thread where a fellow reefkeeper displayed his tank under 5 metal halide bulbs - 500g 10ft aqaurium.

    That thread soon turned into this:

    Tank of the Month - September 2007 - Reefkeeping.com

    I loved this set up because it was an example of a reef tank that functioned with one lighting scheme. I PM'd Mike and he asked me to call immediately. He convinced me that after viewing the Coralvue 12K Reeflux bulbs I would have found my perfect 50/50 Metal Halide bulb. He asked me if I wanted to come over and of course, how could I pass up the opportunity. I was in awe of his tank from the first second I saw it. I was immediatelty drawn to the natural look of single MH bulbs creating a view that reminded me of "swimming in the ocean on a sunny day."

    I took about 250 photographs of Mike's tank that day and from there I visited several more times to take additional pictures for the article as well as just rapping about reefkeeping. It is amazing who you may meet in this hobby. All by chance in looking for the perfect bulb for me.

    The reason I mention this series of events involves how my mind changed about planning for the new 156g reef. I had an extra Icecap 660 ballast so I was convinced I was going with VHO's and 10K bulbs. Not anymore.

    The design for the stand increased from 30" to 36" to allow for a larger skimmer and the canopy was raised from 12" to 20" to compensate for 400w bulbs instead of 250w bulbs.

    The last couple months has been a hell of a ride. Most importantly I have a new reefkeeping buddy that I can rely on for sound advice. I have always felt that having one or two reef geeks in close contact is best to reference the flood of information we are exposed to every day.
    "Jim" - always learning


  4. #4
    Insightful Reefer bubbletip's Avatar
    Join Date
    Aug 2006
    Location
    Chicago
    Posts
    198
    Thanks
    0
    Thanked 0 Times in 0 Posts

    finally...

    Finally the stand and canopy were close to finished. Matt was particularly busy and did not have the time to sand and stain everything prior to a key weekend that Mike was available to help me plumb the tank. It all worked out after two whole days of sanding and staining the stand so we can get this little baby plumbed.

    Here is the end result of the stain job. I used the Minwax Polyshades - Honey Pine(2 coats) along with 3 coats of polyurethane.


    And here is the stand and tank in its final resting place. It was the heaviest tank I had lifted to date. It slides into the stand instead of on top. I really liked this design. Makes for a cleaner look. While lifting it to slide in the stand, Mike had jerked a bit and the tank was on its way down Luckily my knees broke the fall and all was well except my knees of course.


    Well, here we are finally ready to plumb on Sunday - August 19, 2007

    Just a little tangent. I will be posting several posts that will not be direct answers to people's questions, but to furthur explain the project in general. I will answer any questions seperate from these types of posts. Enjoy everyone - the journey begins...
    Last edited by bubbletip; 09-15-2007 at 08:56 AM.
    "Jim" - always learning


  5. #5
    Crispy Reef Monkey **MOD** Phurst's Avatar
    Join Date
    Jan 2007
    Location
    Richmond, Virginia
    Posts
    3,921
    Blog Entries
    3
    Thanks
    5
    Thanked 39 Times in 33 Posts
    Wow, that looks like a really great setup! I'm looking forward to following your progress.

  6. #6
    Insightful Reefer bubbletip's Avatar
    Join Date
    Aug 2006
    Location
    Chicago
    Posts
    198
    Thanks
    0
    Thanked 0 Times in 0 Posts

    Drilling

    So, the day started out with drilling the sump. I have never drilled acrylic - only glass - so Mike to the rescue. He used a hole saw - drilled a pilot hole - and used olive oil to lubricate. Pretty cool.


    He drilled 4 holes total -

    Hole #1 - 2" hole for a 2" bulkhead for the Reeflo Dart pump on the return side. This was the toughest hole to drill apparantly. The bigger you go I guess greatens susceptabiltiy to crack the sump. The drill wanted to jump often. Olive Oil helped and was only used for this big hole. Whew - sump in tact 
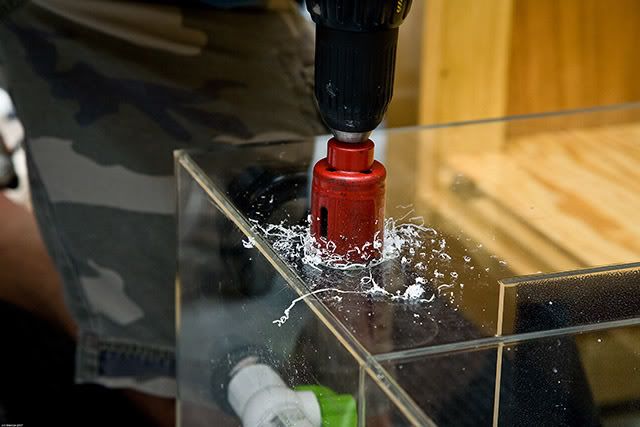
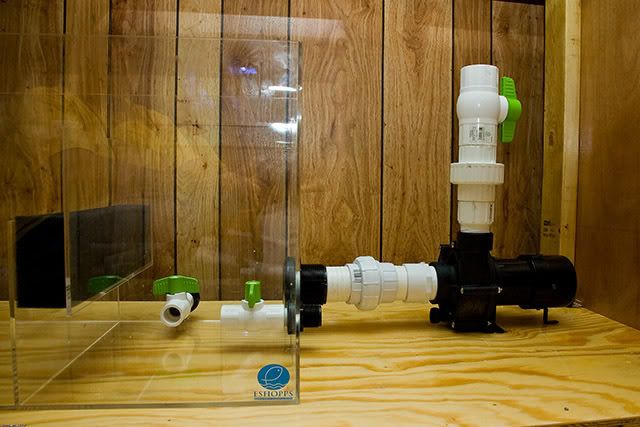
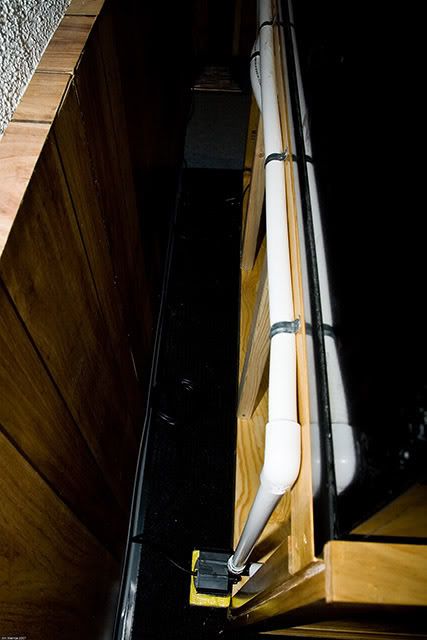
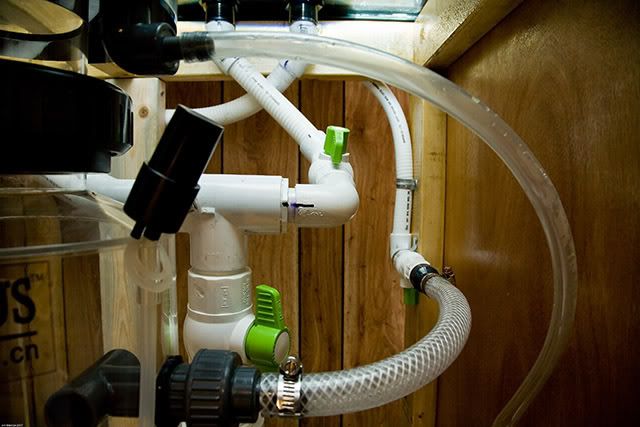
Nice job Mike! I can tell drilling the other holes were secondary as we had one shot to get the 2" bulkhead in as only one sump in the house. It was definitely a relief and the drilling continued. You can see the 2" bulkhead fastened to the sump in this shot:


    (ESHOPPS - 37 gallon capacity - Reef Sump)
    --------------
    Hole #2 - 3/4 inch bulkhead - possible chiller in the future on the return side
    --------------
    Hole #3 - 3/4 inch bulkhead - used for an external pump - I will be plumbing a refugium or a frag tank - have not decided yet - still planning it out. You will notice a bit more than 3ft on the right side of the tank for a 24-26" custom cube or 45 tall cube refugium. I wish I could have done it all it once but money talks and everything has gone towards the main display. I may just end up plumbing the 30g cube in, but I know it would be better off as an ongoing quarantine tank. More to come here...

    You can see Hole #3 and hole #2 connected to a ball valve here:


    --------------
    Hole #4 was a surprise - the intention was to use the mag 7 as the feed pump for the skimmer "inside" the sump. I figured why not, so the hole was drilled for another 3/4 bulkhead right where the drain lines come in. Problem is the pump after glueing was going to hang off the back of the stand by the length of the pump. I jerry rigged 3 pieces of 2 x4 that set the mag 7 up right where it needs to be.


    Easy enough. The skimmer called for about 350gph to operate optimally. Using a mag 7 - the flow needed to come down and putting it in the sump would have meant heavily restricting the pump with a ball valve. I still have a ball valve on but have it kept wide open. In the sump a mag 5 would have been best to keep the flow down feeding this particular skimmer. Skimmer running well. More to come later...

    So some flexible Spa Flex PVC was line against the back of the stand with horseshoe clamps reducing flow just enough for the skimmer to do its thing. I would say about 4-5 ft head loss - have not measured it yet. The flexible PVC Mike uses is excellent - bendable but sturdy providing a much cleaner set up than I have seen with most rigid PVC setups - more to come here as well...


    So there you have the four holes. Mike did an excellent job on the holes and made it look too easy. All we had left to do is plumb it...
    "Jim" - always learning


  7. #7
    Insightful Reefer bubbletip's Avatar
    Join Date
    Aug 2006
    Location
    Chicago
    Posts
    198
    Thanks
    0
    Thanked 0 Times in 0 Posts
    Quote Originally Posted by Phurst View Post
    Wow, that looks like a really great setup! I'm looking forward to following your progress.
    Thanks Pearson!

    I think you will really enjoy this one - I could have gotten started several weeks ago but decided not to as days go by and not much is happening. After the cycle is complete things get going and there is more to explain. Now I can catch up and start from the beginning as my thoughts are gathered and I can get each step of the project out collectively.

    And just for everyone to note - If qouting something try to copy/paste it - Some of these posts are going to be pretty long and full of pictures and I really don't want to bog down Rob's server - just looking out for the man.
    "Jim" - always learning


  8. #8
    Insightful Reefer bubbletip's Avatar
    Join Date
    Aug 2006
    Location
    Chicago
    Posts
    198
    Thanks
    0
    Thanked 0 Times in 0 Posts

    Plumbing the Dart...

    I originally planned on a Panworld 150 for the return. After realizing the amount of watts this pump produced(1100gph - 180w & I am sure just as many amps as the Dart), I enquired about the possibility of putting a Reeflo Dart(3600gph - 160w & 1.4 amp max.) as the return. There are 1" drains so the increased gph they are able to manage was made possible by expanding one of the drains to 1.5" into the sump. I had the Dart cranked down for the first few weeks and am now able to keep the Dart almost all the way open. This has created a ton more flow than I had expected. I knew I would have powerheads inside the tank so the return pump was meant to be supplementary. Now the returns are a whole circulation system on their own. This is where I trust the experts. The Dart is rated much higher than the Panworld 150, but was made possible on these 1" drains with Mike's experience. So there you have it, a high rated pump on a return. You may ask if there is a refugium down below and there is "one", just not customary to what people typically keep - macroalgae. My goal was to free up space in the aquarium and place about 30lbs of live rock in the sump. I can still manage another ten pounds in there. This is where hooking up a macroalgae or seagrass refugium will come in later in the empty space to the right side of the display.

    Here is a side view of the dart. We came in 2" from the bulkhead to get full flow. The union Mike used is much shorter than the average 2" union. This helped get the dart in the stand with some breathing room.


    Here is a top down view with the two ball valves for future equipment. I really like this approach as you can turn the water off right at the sump. The main reason for going in the sump is to leave room for external plumbing and equipment. It would not have been possible to put in a 2" ball valve for taking off the Dart. Simply, the sump must be drained below the Dart before servicing the pump. An extra step yeah, but no problem as we got this to work.


    Here is a good view of the return section of the sump. Later a curved 45 degree bend is put in for the Dart aimed down for the intake on the Dart. The Dart comes off at the 1.5" union and shut off by a 1.5" ball valve.


    Here is the dart partially plumbed. You can see a 1" ball valve after being reduced form 1.5". This Oceanic tank had four 1" holes drilled on the bottom of the overflow boxes which allowed us to come back into the tank at 1" instead of 3/4", as would have been if we used the cheap 3/4" bulkheads given with the overflow kits. The ball valve cranks down the closest return so the flow would balance out with the left side return. You can see the 1" drain increased to 1.5" at the top of the sump on the left hand side. The Mag 7 is right where the drains come in for the skimmer feed. You will also ntoice the open sump perfect for 30-40lbs of live rock. Again this will be an SPS Dominant reef and the fish will have there room to do their thing as well.


    The stand is about 62" inside the 2x4's so the sump(36" long) and the skimmer(22" needed) left little breathing room. The skimmer is also 30" tall and the floor to the stand was put in afterwards to fit all of this under a five foot tank. The skimmer had to get in to make this work.
    "Jim" - always learning


  9. #9
    Insightful Reefer Russel P's Avatar
    Join Date
    Jan 2007
    Location
    Asheville, NC
    Posts
    283
    Thanks
    0
    Thanked 0 Times in 0 Posts
    Beautiful sump you have going! Flexible PVC is new on me, I'm setting up a big tank too -gotta track down that. Can't wait to see how this progresses!

  10. #10
    Insightful Reefer bubbletip's Avatar
    Join Date
    Aug 2006
    Location
    Chicago
    Posts
    198
    Thanks
    0
    Thanked 0 Times in 0 Posts

    The Skimmer

    Initially I was thinking of doing a custom 48" sump/refugium which would also house a skimmer. Wanting enough room for live rock in the sump, I needed everything to be external so that live rock could be placed there. Mike suggested an open sump for live rock and a recirculating skimmer to be plumbed externally.

    The Octopus DNW-200 Recirculating Skimmer

    Specs:
    - 7.8" Diameter
    - 29.64" Tall
    - Footprint 9" x 21"

    I know ratings don't always realistically display the threshold for effective operation. This skimmer was rated to 400 gallons. This system is currently at approximately 170 gallons. I wanted a skimmer that would skim hard to allow for a larger bioload. I always manage to reintroduce trace minerals regularly through weekly water changes, ESV B-Ionic 2 part & Magnesium, and Ecosystems Reef Solution. I have been using this method for the last 12 years and have been pretty successful doing so. I have a skimmer rated for 125 gallons for my 30g cube as well.


    This is a fabulous skimmer. Well constructed, tight fittings, and a skimmer cup that comes off without having to lift it up out of a tube. I only have two inches to the bottom of the tank so if it needed to be lifted, I was out of luck.

    Here is another shot of the mag 7 feeding the skimmer:


    This shot shows you the end of the spa flex connected to a ball valve to turn down the skimmer feed if need be. You can also see the ball valve on the closest return to balance the flow.

    "Jim" - always learning


  11. #11
    SPS Reefer / TR Admin lReef lKeeper's Avatar
    Join Date
    Dec 2006
    Location
    Louisville, Ky
    Posts
    4,687
    Blog Entries
    6
    Thanks
    1
    Thanked 5 Times in 5 Posts
    looking great, i am looking forward to following this thread. do you think that the mag7 is going to be strong enough to supply that skimmer with that much head pressure ?? i would estimate that is going to be running about 450 - 500 gph with the head loss.
    lReef lKeeper (Bobby) Admin and Reefer

    Water ...
    Custom 4x2x1 60 gallon, 40B sump

    Equipment ...
    6x54w HO T5 fixture, 300+g rated Frankenskimmer, ATO, 3 Media Reactors (1 p04, 1 N03, 1 Carbon)

    www.lmas.org


    Show people you appreciate their advice! Click the star icon under their name to add to their reputation.


  12. #12
    Insightful Reefer bubbletip's Avatar
    Join Date
    Aug 2006
    Location
    Chicago
    Posts
    198
    Thanks
    0
    Thanked 0 Times in 0 Posts
    Thanks Bobby

    The skimmer asks for 1.5 - 2x tank volume - figure 170-180 gallon system - so 350gph is probably optimal. I am at a bit more than that with the head loss which is why I left the option to turn down the feed if need be. It seemed to me that putting the mag 7 right where the drains come in would be best for effective skimming. If we went with a mag 5, I definitely would not have enough gph with the head loss. Just for reference - their is an additional pump on this recirculating skimmer connected at the base of the skimmer to create the bubbles. The mag 7 is simply just to feed the skimmer water from the sump.
    "Jim" - always learning


  13. #13
    SPS Reefer / TR Admin lReef lKeeper's Avatar
    Join Date
    Dec 2006
    Location
    Louisville, Ky
    Posts
    4,687
    Blog Entries
    6
    Thanks
    1
    Thanked 5 Times in 5 Posts
    i guess if i would have paid more attention to the pics ... i would have noticed that !! DUH

    looking great !!
    lReef lKeeper (Bobby) Admin and Reefer

    Water ...
    Custom 4x2x1 60 gallon, 40B sump

    Equipment ...
    6x54w HO T5 fixture, 300+g rated Frankenskimmer, ATO, 3 Media Reactors (1 p04, 1 N03, 1 Carbon)

    www.lmas.org


    Show people you appreciate their advice! Click the star icon under their name to add to their reputation.


  14. #14
    Insightful Reefer bubbletip's Avatar
    Join Date
    Aug 2006
    Location
    Chicago
    Posts
    198
    Thanks
    0
    Thanked 0 Times in 0 Posts
    Quote Originally Posted by Russel P View Post
    Beautiful sump you have going! Flexible PVC is new on me, I'm setting up a big tank too -gotta track down that. Can't wait to see how this progresses!
    Hey Russel P.,

    Thanks for the complement. I just wish it was me that designed it It was a pretty tough decision deciding upon whether I would do a sump/refugium or not. I guess knowing I was going to use a Dart for a return helped make the decision. Adding a refugium in the sump would have way too much flow through it to be of any use. Besides, my main reason for the sump is to keep rock out of the tank as well as a place to grow copepods and amphipods. The removal of nitrate will come later when a refugium is set up next to the tank. The bioload will be so low for a while that I am not concerned. My 30g cube has been going a year now and my nitrate tests 0 and without a refugium. I feed twice a day as well. The skimmer is over rated which I feel helps to keep the nitrate so low.

    I will see if I can get some info. on the flexible PVC. Mike brought it over to use. He does all of his tanks this way I will go into more depth onthe spa flex in the next section...
    "Jim" - always learning


  15. #15
    Master Reefer NaClFinatic's Avatar
    Join Date
    Jun 2006
    Location
    PA
    Posts
    590
    Thanks
    0
    Thanked 0 Times in 0 Posts
    That is giong to be a great setup! What are you tank dimensions?

    And that tank of the month is awesome. When I saw it I started considering the reflux also

  16. #16
    Insightful Reefer bubbletip's Avatar
    Join Date
    Aug 2006
    Location
    Chicago
    Posts
    198
    Thanks
    0
    Thanked 0 Times in 0 Posts
    Quote Originally Posted by NaClFinatic View Post
    That is giong to be a great setup! What are you tank dimensions?

    And that tank of the month is awesome. When I saw it I started considering the reflux also
    Thanks David, just waiting on the 12K Reeflux bulbs and ballasts - will be fired up this coming wekend.

    Mike's tank is quite amazing. I have not seen that kind of color and growth since the guy that taught me 12 years ago - His name was Jason - knew him for a year - never got his last name - moved to Florida to become a marine biologist - still trying to track him down - I would love to see what he is doing these days.

    The tank dimensions are 60.5" long x 25" wide x 24.5" tall - I really contemplated going with a 30" tall tank. My arms are long enough to do any necessary maintenace with ease at 24.5".
    "Jim" - always learning


  17. #17
    Our Brotha Down Unda
    V's Avatar
    Join Date
    Mar 2006
    Location
    Terra Australis
    Posts
    6,773
    Blog Entries
    15
    Thanks
    1
    Thanked 29 Times in 28 Posts
    hey bubble

    progress looks good bud, arr the journey once again hey!
    looks like its all coming together nicely. id suggest while the skimmer & sump are still being worked on, you get yourself a drip tray under it all. saves hassles later, essecially cause you have wood.

    nice job, look forward to your progress. glad your keeping the DT on the lighter side, no-one likes to keep it simple anymore do they!


    Vquilibrium Productions

  18. #18
    Insightful Reefer bubbletip's Avatar
    Join Date
    Aug 2006
    Location
    Chicago
    Posts
    198
    Thanks
    0
    Thanked 0 Times in 0 Posts
    Quote Originally Posted by veriann View Post
    hey bubble

    progress looks good bud, arr the journey once again hey!
    looks like its all coming together nicely. id suggest while the skimmer & sump are still being worked on, you get yourself a drip tray under it all. saves hassles later, essecially cause you have wood.

    nice job, look forward to your progress. glad your keeping the DT on the lighter side, no-one likes to keep it simple anymore do they!

    Sir Veriann,
    Argghh! We meet again!

    How's it going man - took a little hayetus(don't think that is how you spell it) from the forums for a while. Back in business my friend.

    It has actually come a long a lot farther than you have seen. I have been past the initial cycle and have my herbivores in the tank. I started this thread up a little late on purpose as it just drags out during the first month or so. I wanted to have a lot more to see right off the bat so people can get an idea of the system without having to surf through several pages. If you remember my posts in the past Veriann, I am very thorough.

    Thanks for the tip on the drip tray. Unfortunately like I said everything is installed and it would kind of be a pain to slip one under(not impossible - just a pain) - any recommendations on here to get one? I purposefully coated the flooring with 5 coats of polyurethane so I should be alright. Luckily I have not had any spills so far

    Enjoy the thread Veriann - I will be caught up soon...
    "Jim" - always learning


  19. #19
    Our Brotha Down Unda
    V's Avatar
    Join Date
    Mar 2006
    Location
    Terra Australis
    Posts
    6,773
    Blog Entries
    15
    Thanks
    1
    Thanked 29 Times in 28 Posts
    good thinking bubble,hey...always ahead of the times bud. i'll check in often to see your master piecegrow


    Vquilibrium Productions

  20. #20
    Insightful Reefer bubbletip's Avatar
    Join Date
    Aug 2006
    Location
    Chicago
    Posts
    198
    Thanks
    0
    Thanked 0 Times in 0 Posts

    The Skimmer

    I have always beleived as Skimmer technology got better and better that "heavy" skimming is a good way to keep water conditions optimal. Currently on my 30g cube I am using a skimmer rated at 125g. Now I am sure that figure is based on a medium load aquarium of 125g. Skimmers are typically rated this way so to estimate - this skimmer can probably handle a heavy load in 75g of water tops. That would mean I am still skimming very hard for the system in place. It is important to mention that I have not run a refugium in the past year on this cube and my nitrates always test out at 0. I have two different nitrate test kits(API and Salifert) to compare. So basically the biological system in this cube can handle a couple feedings a day and still maintain 0 nitrate. Again, I like to skim hard.

    The biggest concern most people have with oversizing protein skimmers is the reduction of trace elements throughout the system. Again, I have only known B-Ionic, reef solution and regular water changes(weekly). I know by the regular introduction of trace elements, that heavy skimming does not effect the system. I should add that I run carbon 24 hours a day, 365 days a year. Yes again, I realize they strip trace elements, hence the regular supplementary additions to the system. Reason for running carbon(changed regularly) is to allow for water clarity that is so high that light can easily penetrate and reach the corals optimally.

    After talking to Mike Leonard(9/07 TOTM winner) for several days, we both realized our philosophies on reefkeeping were quite similar. We both beleive in heavy skimming and heavy feeding(slowly increased over time of course) of the system(read TOTM article with the section on feeding to get the picture). For so many years reefkeepers have been told to lighten the load or your coral will suffer. Hogwash Corals thrive when we can mimic what our oceans have to offer as much as possible. I am not saying more is better. I am saying that more feeding of the system built up over time is a good way to build a balanced ecosystem with high biodiversity.

    So on to the important stuff - what skimmer to choose. I was really considering a becket style skimmer as I thought I was going to need to place the skimmer in sump. I am pleased to say that we were able to get this skimmer:

    Octopus DNW-200 Recirculating Protein Skimmer* - AquaCave

    outside of the sump so that I can free up some space for live rock. This is what I wanted but thought was not possible under a 5ft tank. We were able to create a very manageable system with plenty of room for maintenance.


    This skimmer is rated for 400 gallons so this skimmer should do well for this 175g soon to be 200 - 225g system.

    The skimmer operates with two pumps, Mag 7(see previous posts) and an Octopus 3000 neeedle wheel pump. It has been very efficient so far and was extremely easy to set up. The most plug and play skimmer I have ever used. I spent a week doing a vinegar wash which consisted of running the skimmer offline with a gallon of vinegar and filled up with water. This certainly helped get some of the oils out of the acrylic, but it still took the skimmer 2 weeks to break in after the cycle started. The lid comes off the neck without lifting it which was key to fitting it under the stand. You can tell why we needed 36" under the tank while raising the floor to accomodate this skimmer. All in all I am very pleased with the skimmer. I am sure it will get plenty of use.
    "Jim" - always learning


  21. #21
    Our Brotha Down Unda
    V's Avatar
    Join Date
    Mar 2006
    Location
    Terra Australis
    Posts
    6,773
    Blog Entries
    15
    Thanks
    1
    Thanked 29 Times in 28 Posts
    Skim or die trying

    looking good bud, removeable panels on the sides, or just front.

    you got modular tubing coming up from the overflows?


    Vquilibrium Productions

  22. #22
    Grand Master Reefer wildeone's Avatar
    Join Date
    Apr 2006
    Location
    Central Ohio
    Posts
    1,030
    Thanks
    0
    Thanked 0 Times in 0 Posts
    Jim,
    Great looking setup, first time I looked at your journal. I like how clean it is, you have put alot of thought into it. Looks like you may have the same issue I have, just a single duplex outlet. I made up my mind that when i do mine, I am going to make something custom for power. I have way too much reliance on multi-outlet strips!

    Awsome, can't wait to see more!

  23. #23
    Insightful Reefer bubbletip's Avatar
    Join Date
    Aug 2006
    Location
    Chicago
    Posts
    198
    Thanks
    0
    Thanked 0 Times in 0 Posts

    The Skimmer

    Oops - double posted...
    Last edited by bubbletip; 09-20-2007 at 03:23 PM. Reason: double post
    "Jim" - always learning


  24. #24
    Insightful Reefer bubbletip's Avatar
    Join Date
    Aug 2006
    Location
    Chicago
    Posts
    198
    Thanks
    0
    Thanked 0 Times in 0 Posts
    Quote Originally Posted by wildeone View Post
    Jim,
    Great looking setup, first time I looked at your journal. I like how clean it is, you have put alot of thought into it. Looks like you may have the same issue I have, just a single duplex outlet. I made up my mind that when i do mine, I am going to make something custom for power. I have way too much reliance on multi-outlet strips!

    Awsome, can't wait to see more!
    Thanks Wildone

    I had a fellow reekeeper/electrician come out to put in an extra 20 amp circuit. So the outlet is split with a 20 amp and a 15 amp. About 3 amps is used on the 15 amp circuit potentially with other outlets in the house. I will have just enough power for this set up and a refugium or frag tank plumbed into the main display. There is no way i can do 2-400w bulbs if I did not have at least one dedicated circuit. He only charged $180 for 6 hours of work. Pretty cool! I did give him a bunch of frags. I was going to give them to him regardless of the price though. Glad you like the set up. I am almost done with my spiels on planning out this system.

    And then we will focus on the livestock....
    "Jim" - always learning


  25. #25
    Insightful Reefer bubbletip's Avatar
    Join Date
    Aug 2006
    Location
    Chicago
    Posts
    198
    Thanks
    0
    Thanked 0 Times in 0 Posts
    Quote Originally Posted by veriann View Post
    Skim or die trying

    looking good bud, removeable panels on the sides, or just front.

    you got modular tubing coming up from the overflows?
    Skim Hard, Reef hard!

    Thanks V.,

    I wanted removable panels on the side but decided since it was so open in the front that it was an unnecessary cost - especially after seeing the estimate

    There is pseudo locline provided by Oceanic for the returns from the dart - regular locline will not work with it - kind of stuck with what they gave unless I want to swap out for original locline.

    The amount of pressure coming out of those returns is simply amazing - the Dart is creating a significant amount of flow.
    "Jim" - always learning


Page 1 of 4 1 2 3 ... LastLast

Thread Information

Users Browsing this Thread

There are currently 1 users browsing this thread. (0 members and 1 guests)

Similar Threads

  1. Corey's first salt water tank
    By Coreyz in forum Member Tank Projects
    Replies: 284
    Last Post: 02-19-2011, 03:26 AM
  2. End of my rope - Tank Issues all around
    By mcastfalk in forum Marine Tank Problems
    Replies: 23
    Last Post: 11-27-2009, 03:33 PM
  3. Paul's 50G fish only tank
    By pmartin in forum Member Tank Projects
    Replies: 38
    Last Post: 11-08-2007, 10:30 AM
  4. Sally's new tank
    By stripepike in forum Member Tank Projects
    Replies: 23
    Last Post: 05-30-2007, 05:55 PM
  5. First post...and its the common ICH :/
    By miamireefer in forum Marine Tank Problems
    Replies: 23
    Last Post: 11-04-2006, 02:24 AM

Bookmarks

Posting Permissions

  • You may not post new threads
  • You may not post replies
  • You may not post attachments
  • You may not edit your posts
  •